DepEd User Guides
- User Guide for Teachers
- User Guide for Students
- User Guide for Uploader
- User Guide For Approvers
- User Guide for Publishers
User Guide for Teachers
Table of Contents
1.2 Log in Using DepEd Commons Portal
1.2.1 Send activation instructions
1. Accessing DepEd Commons
This chapter will focus on the steps on how to access DepEd Commons. Teachers can access DepEd Commons using their .deped.gov.ph Google account or their O365 Microsoft account.
1.1 Account Activation
Teacher accounts will be sent an activation email on their deped.gov.ph or O365 accounts. To activate your account, follow these steps:
Step 1. Log in to GSuite or Microsoft O365 using your deped.gov.ph email or O365 email.
Step 2. Find the email with the subject "Your DepEd Commons account is created and needs to be activated!".
Step 3. Click on the email and then click on the link to setup up a new password.
Step 4. Nominate a new password on the Change Your Password page.
Step 5. Edit your account information if necessary and click the Update button. You will be redirected to DepEd Commons Home page.
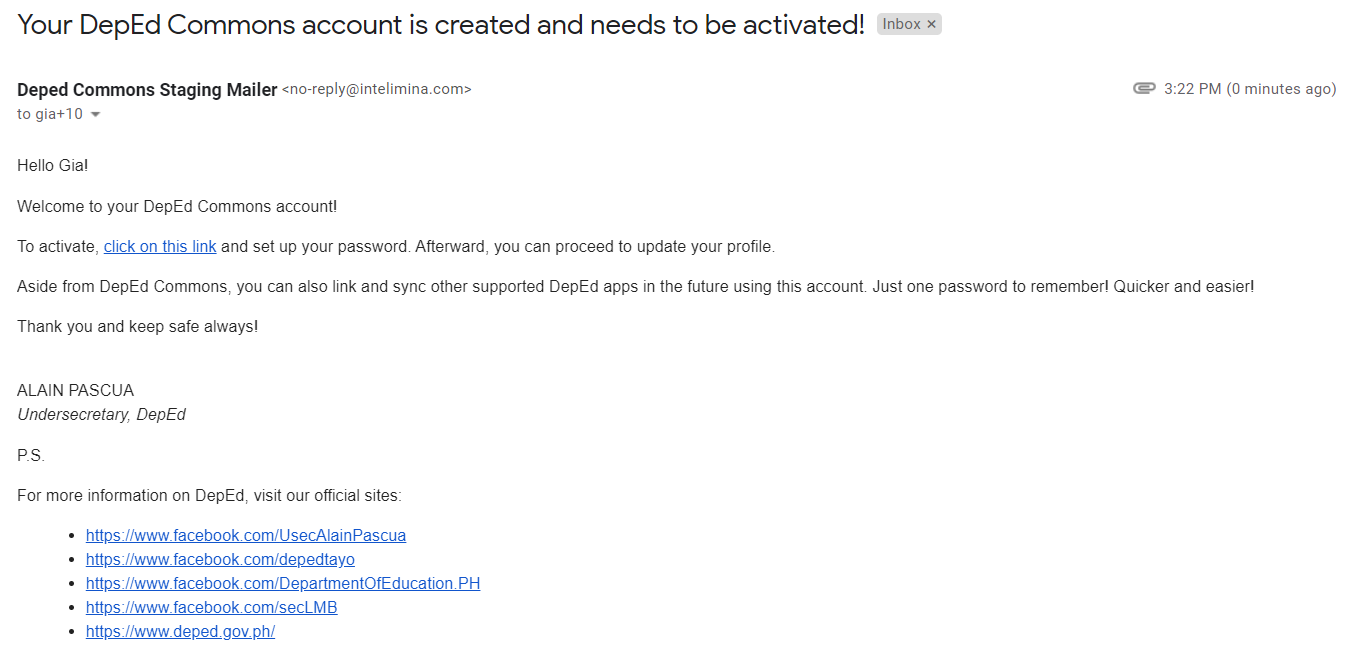
Figure 1. Activation Link Sent via Email
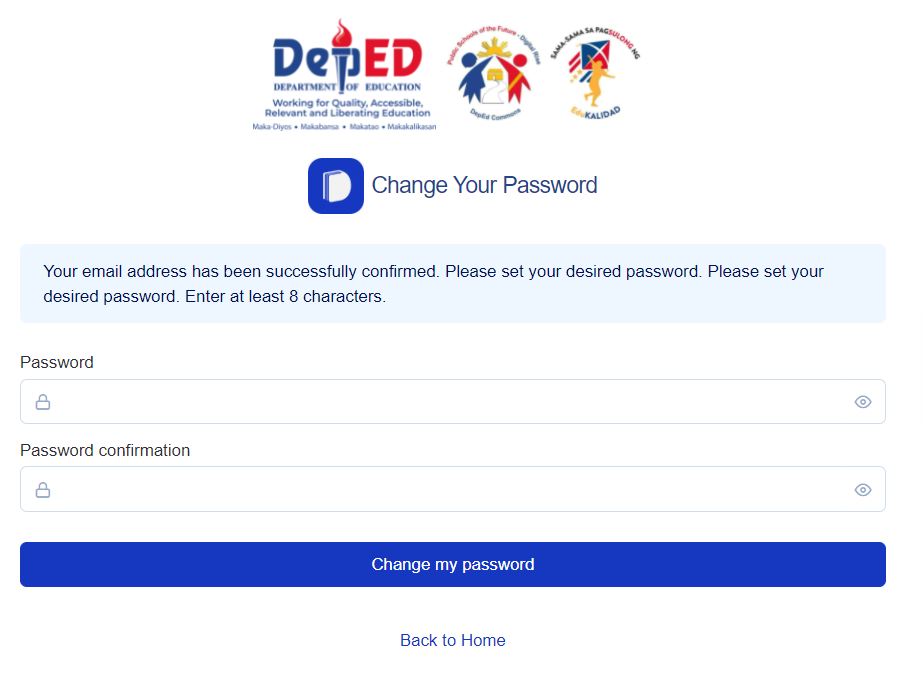
Figure 2. Change Password Page
1.2 Log in via DepEd Commons
For an activated teacher account, log in to DepEd Commons by following these steps:
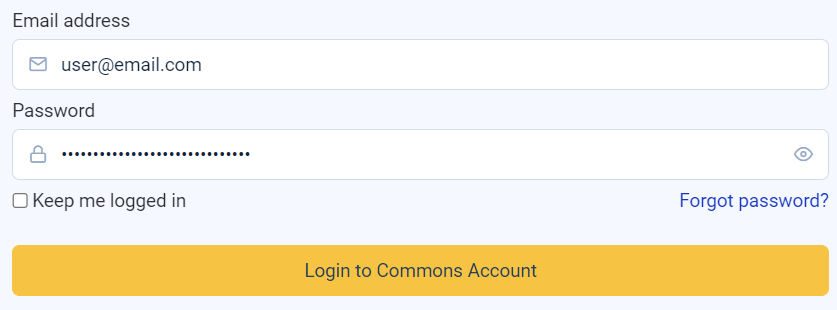
Step 1. Go to https://commons.deped.gov.ph/ and click I am a DepEd Personnel on user type login.
Step 2. Click Login to Commons Account.
Step 4. Enter your email address and password and click Login to Commons Account button. You will be redirected to the DepEd Commons Home page.
1.2.1 Send activation instructions
If you have not received any activation link on your email, click on Didn't receive activation instructions? at the bottom of the Log In page. You will receive an email regarding the activation of your account.
1.2.2 Reset Password
If you have forgotten your DepEd Commons account password, you may click on Forgot your password? at the bottom of the Log In page. You will be redirected to Forgot Your Password? page. Enter your email and click on the Send Request button. An email should be sent to you regarding password reset. Follow these steps after receiving the reset password instructions on your email:
Step 1. Open the email with the reset password instructions.
Step 2. Click the Change my password link on the email.
Step 3. Nominate a new password and click the Change my password button.
You should now be able to log in to DepEd Commons.
1.3 Sign in with Google
To log in with DepEd Commons using your GSuite/DepEd Gmail account, go to https://commons.deped.gov.ph/ and click I am a DepEd Personnel on user type login.
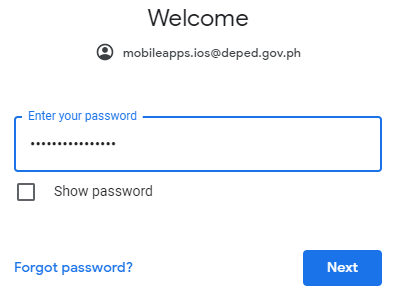
Step 1. Click the Continue with Google button.

Step 2. Enter my GSuite/DepEd Gmail account and click Next.

Step 3. Enter my GSuite/DepEd Gmail account password and click Next. You will be redirected to the DepEd Commons homepage.
1.4 Sign in with Microsoft
To log in to DepEd Commons via your DepEd Microsoft O365 account, go to https://commons.deped.gov.ph/ and click I am a DepEd Personnel on user type login.
Step 1. Click the Continue with Microsoft button.

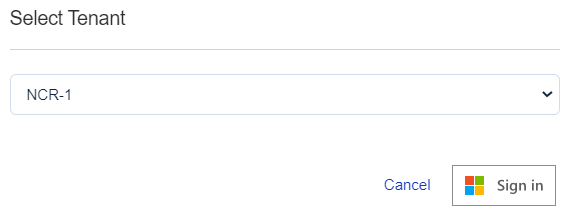
Step 2. Select Tenant and click the Sign In button.
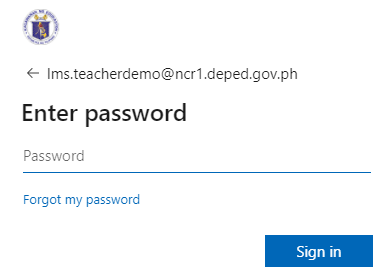
Step 3. Enter my O365 email. Click Next.

Step 4. Enter the password to my O365 account. Click Sign In.
Follow the prompts to authenticate and authorize DepEd Commons to use Microsoft sign-in to login. After a successful login, you will now be redirected to the DepEd Commons homepage.

Figure 3. Teacher Log In Page
2. Teacher Portal
The teacher portal page is where teachers will have access to all the available resources in DepEd Commons. The user interface of the home page is very straight-forward and easy-to-use. In this chapter, we will discuss the three (3) main parts of the home page.
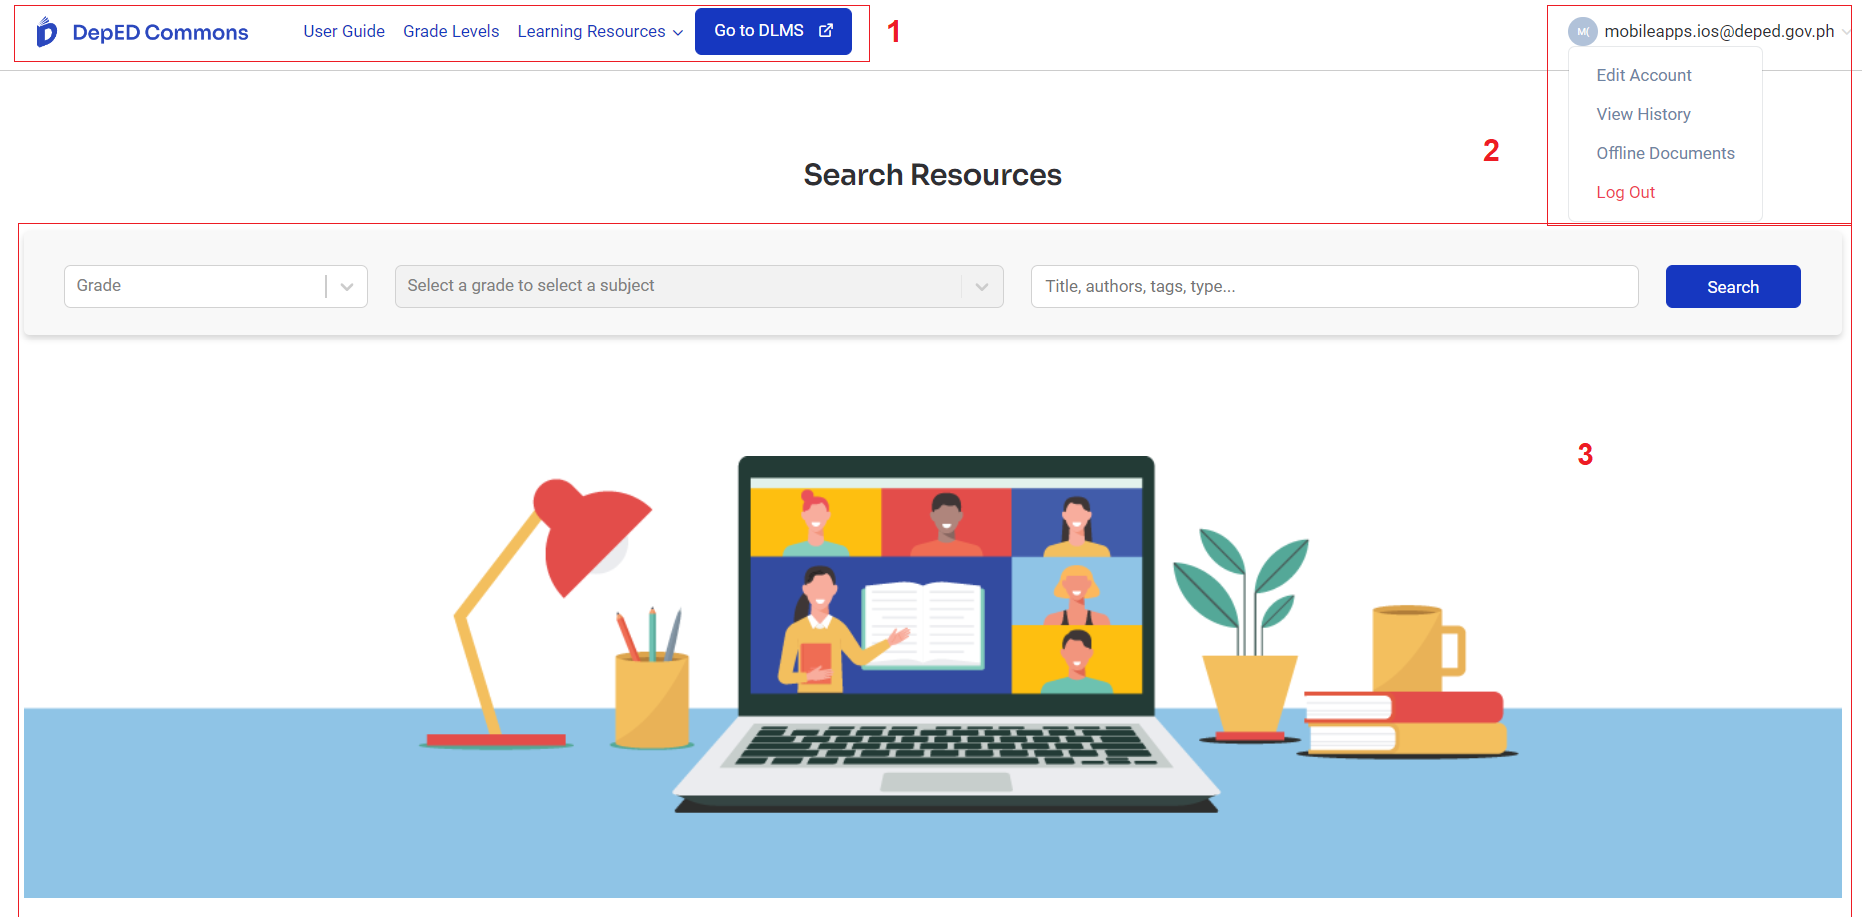
Figure 4. Teacher Portal
3. Resources
3.1 Search Resources
In the home page, the search functionality is displayed for easier access of available resources that are published in DepEd Commons. To search for a resource, follow these steps:
Step 1. Select a grade from the grade level drop down. You may click on the search button after this step. This will display all the published resources from the selected grade level.
Step 2. Select a subject from the subject drop down. You may click on the search button after this step. This will display all the published resources from the selected subject of the selected grade level.
Step 3. On the search bar field, type in the tile of the resource, the name of the author, the category type of the resource, or a tag/keyword. Click the Search button. This will display all the published resources from the selected subject of the selected grade level with the word/s that you have entered on the search bar.
The category type of resources are Assessment, Game/Puzzle, Interactive Offline, Presentations, Video, Mobile Applications, Activity Sheets and Notes, Self Learning Module (SLM), and Electronic SLM.
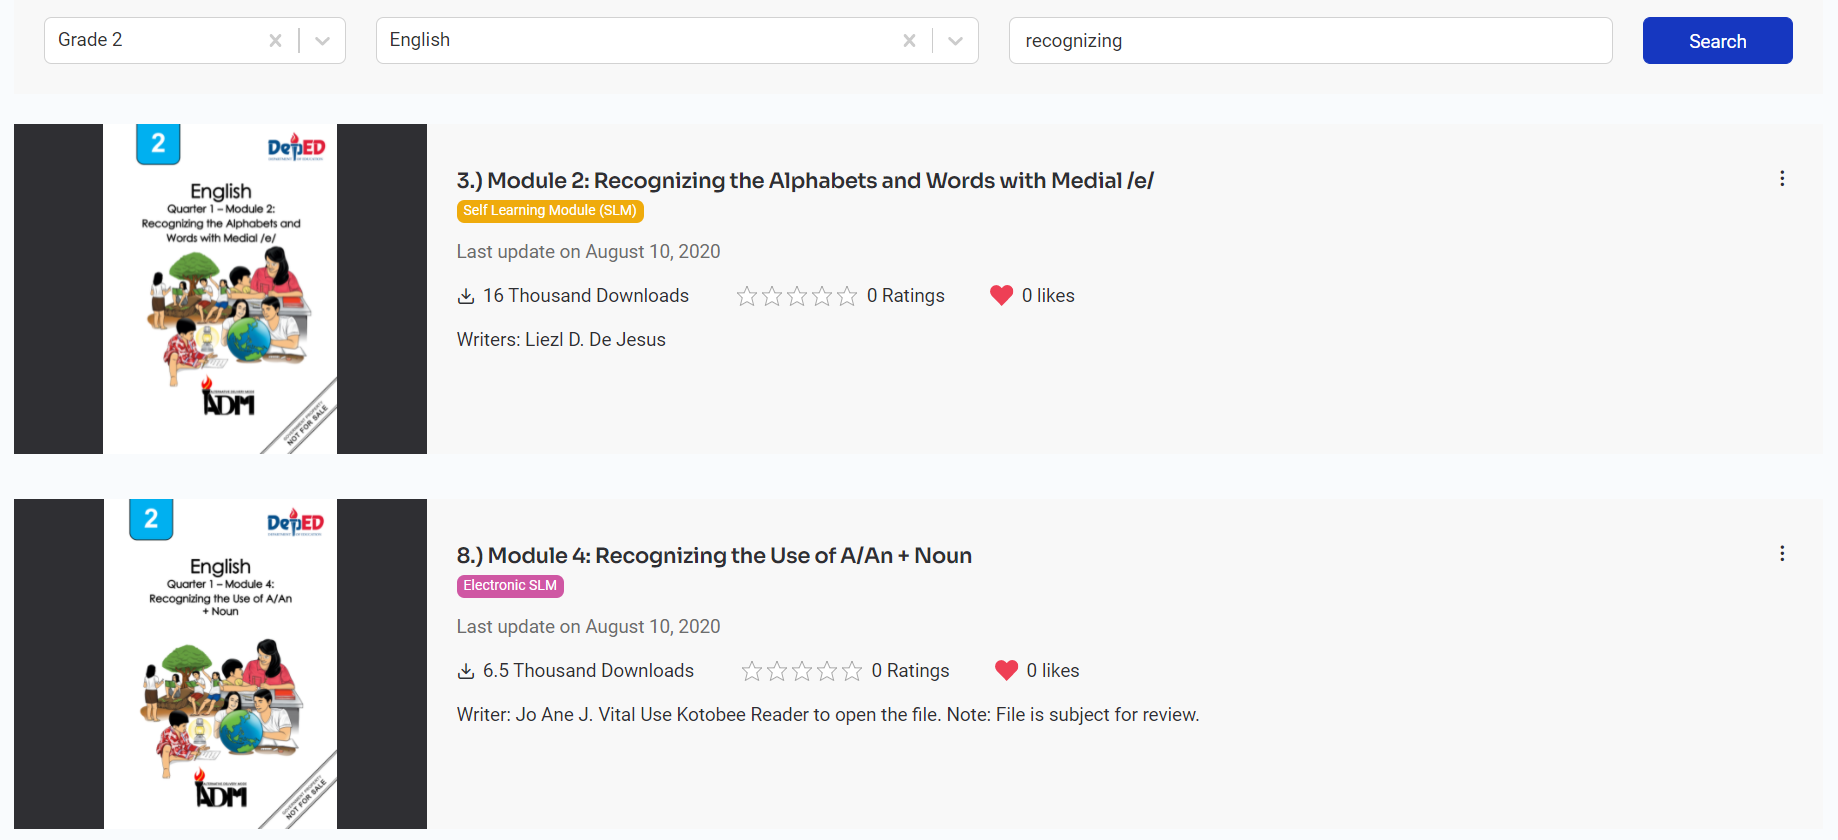
Figure 5. Search result of a search query
In Figure 5., the selected grade level is Grade 2, the subject is English, and the keyword used is "recognizing". The search query displayed two results where both resources are filed under Grade 2 - English with the keyword "recognizing" found on each title.
3.2 Resource Card
After the results are displayed upon your search query, you will see that there are several information included on the resource's card details. We will discuss the seven (7) parts of the resource card.
1. Thumbnail - This is the image that is displayed on the left-most part of the resource card.
2. Title - This is the resource's title.
3. Category type - This specifies what type of learning material the resource is.
4. Number of downloads - The number of downloads is the total number of times a resource has been downloaded and viewed. Clinking on the link attached to a resource is counted as a view/download.
5. Ratings - Ratings are the average ratings given by teachers and students.
6. Likes - Likes are the total number of likes that students and teachers have given to the resource.

Figure 6. Resource Card Details
3.3 Resource Page
In this section, we will discuss the resource page where you will see the full information about the resource. The resource page also contains the action buttons to rate and like the resource. To go to this page, simply click anywhere on the resource card and it will redirect you to the resource page.
The parts of the resource page are the following:
1. Learning Period - This indicates the learning period that the resource is used for.
2. Description - This portion contains any information relating to the resource.
3. Download or Go To link -To download the resource, click on the Download File button. To go to the link of the resource, click on Go to link.
To like a resource, simply click on the heart icon.
Parts 4 and 5 will be discussed on the next sections.

Figure 7. Full Information of a Resource Page
3.4 Offline Documents
Offline documents are resources that can be accessed even without an internet connection. Follow these steps to make a document available offline and to access the offline document:
Step 1. Click on the three vertical dots shown on number 1 of Figure 7.
Step 2. Click on "Make Available Offline". You should see this icon  indicating that the document is available offline. This will make the resource downloadable even when you encounter internet disconnection.
Step 3. Click on the drop down at the top right corner of the header where your email is displayed. Select "Offline Documents." This will redirect you to the documents that you have made available offline.
Step 4. Click on the Download button to download the file.
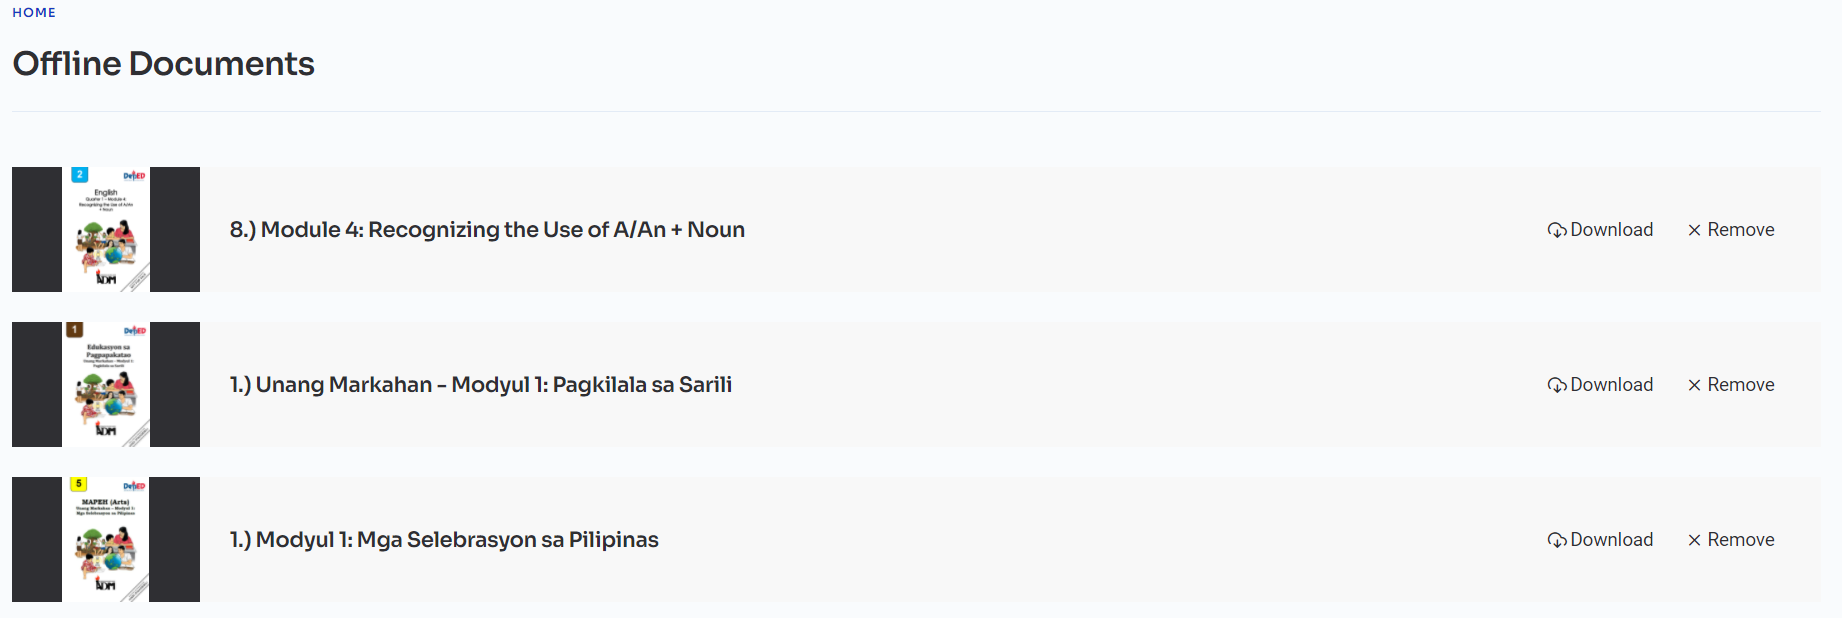
Figure 8. Offline Documents Page
3.5 Reviews
Resources published on DepEd Commons can be rated. Overall ratings of a resource can be found on the resource information page as shown in Figure 7. To write a review and to rate the resource, follow these steps:
Step 1. Click on the Write a Review button.
Step 2. Rate the resource by criteria. The criteria for rating are Content, Presentation, Relatability, Clarity, and Suitability. Each criteria can be given a score of 1 to 5.
Step 3. Type in any additional comments if you have any. This is not a required step.
Step 4. Click the Submit Review button.

Figure 9. Page for Rating a Resource
On the resource page, you will see all the ratings of the resource including the rating that you have given.
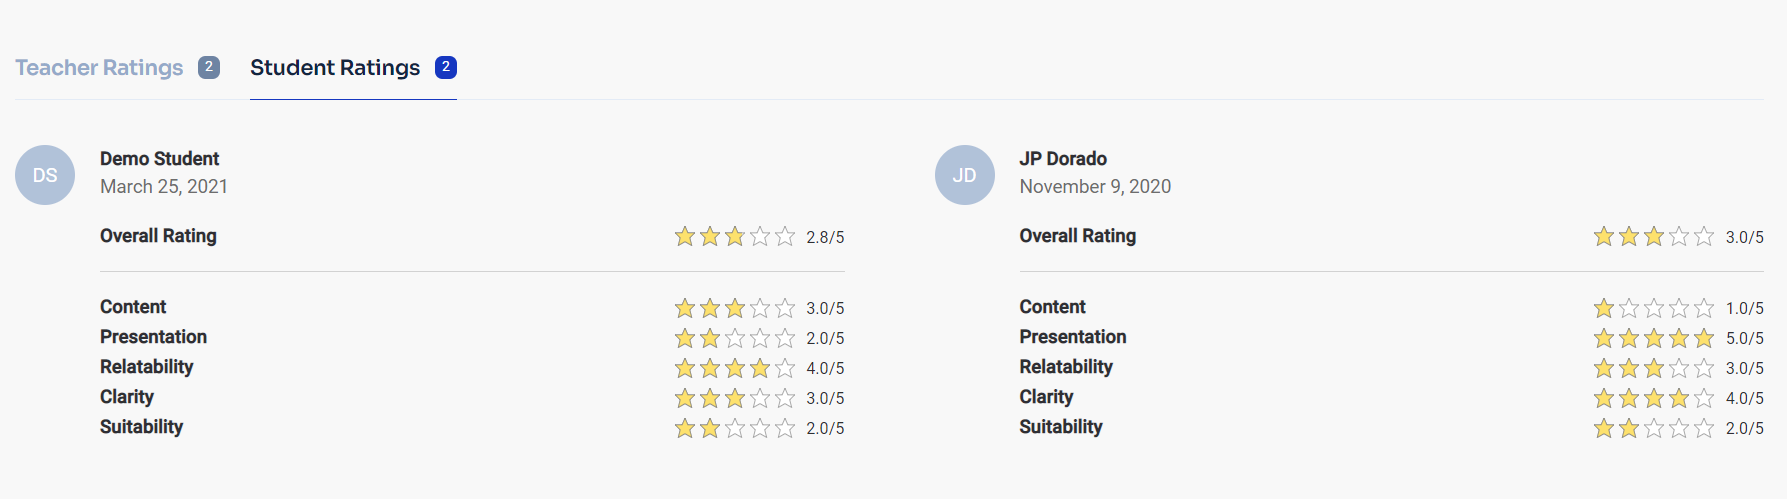
Figure 10. Ratings of the Resource
4. Grade Levels
On the header of the web application, you will see Grade Levels. By clicking this, you will be redirected to a page allowing you to select from the list of Grade Levels. Clicking on a grade level will redirect you to a list of subjects found in the grade level. Select a subject from the list and it will display all the published resources under this category.
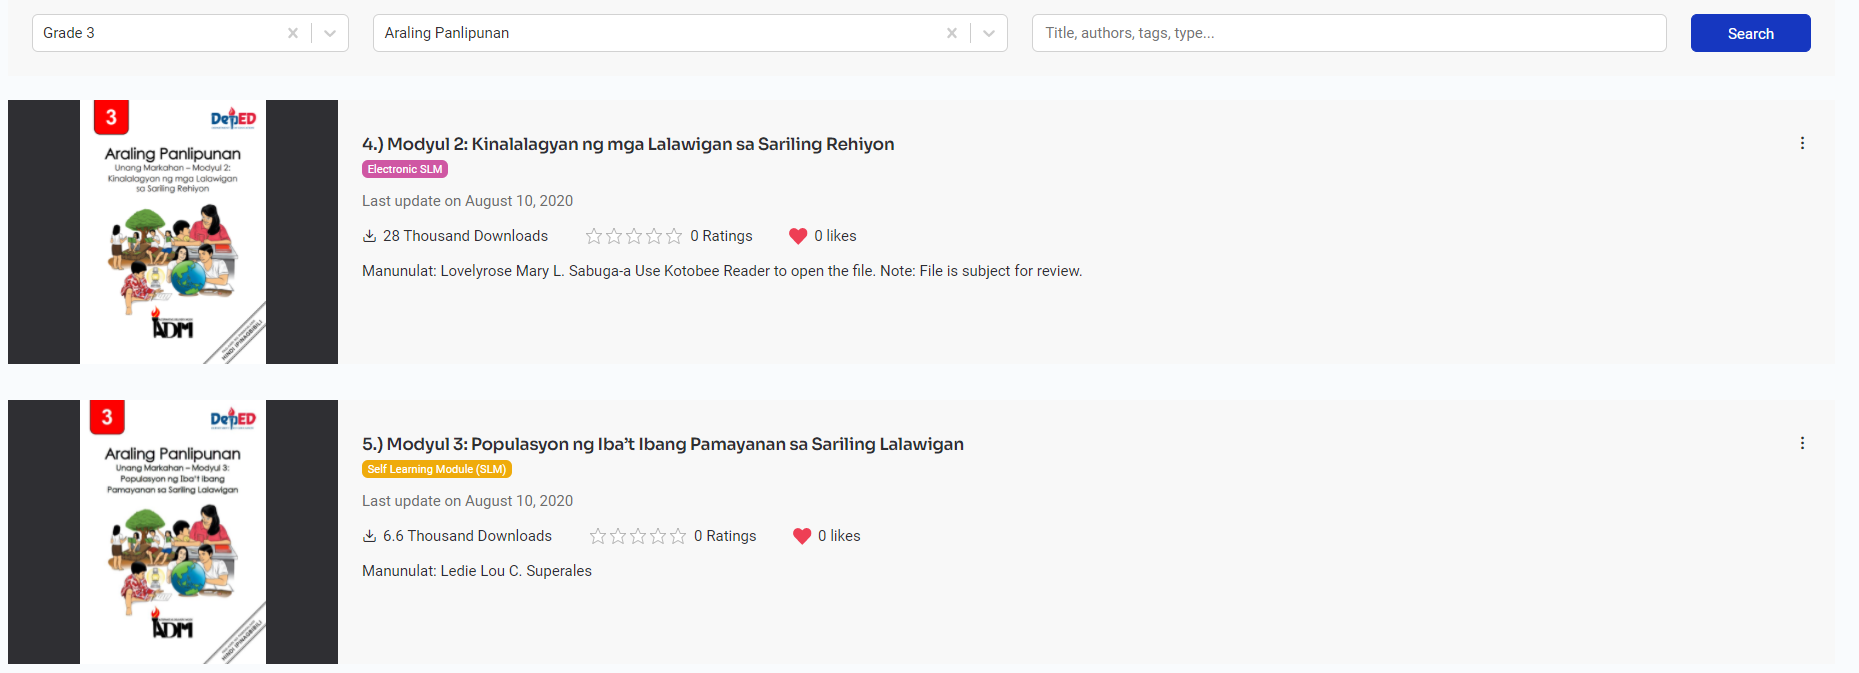
Figure 11. List of Resources in Grade 3 - Araling Panlipunan
A search functionality is also seen on this page. This is the same as the search feature found on the home page.
5. View History
DepEd Commons has a view history feature where you can see a list of resources that you have downloaded, made available offline, or have clicked on the link. This feature can help you check which resource you downloaded most recently or what resource you have checked out.
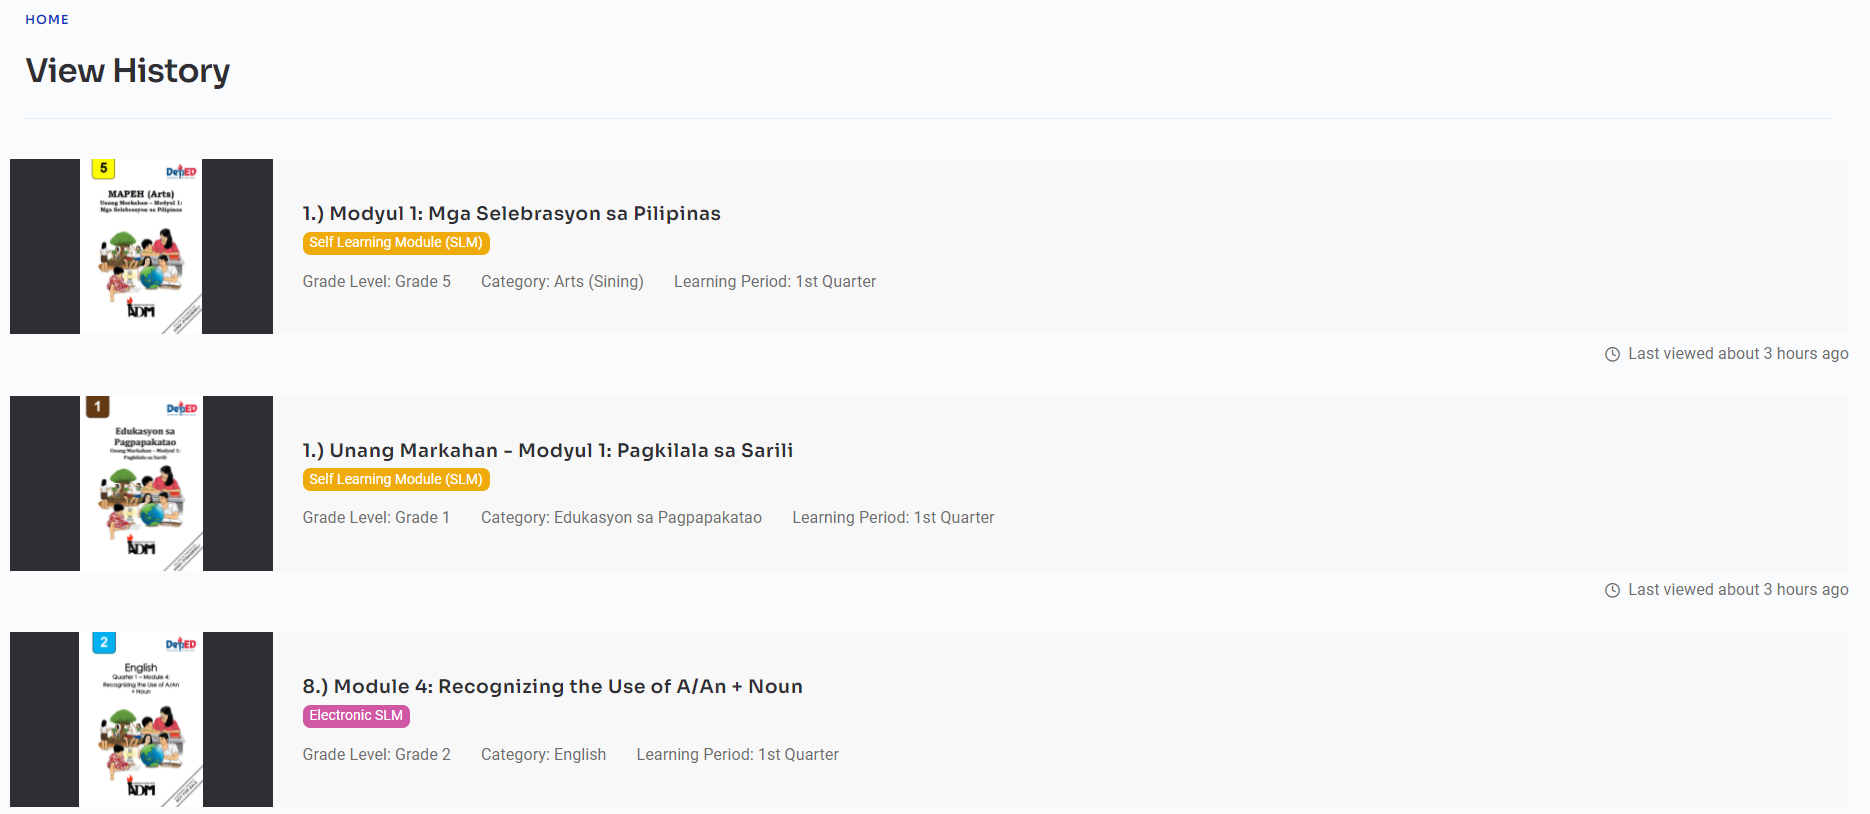
Figure 12. View History Page
User Guide for Students
Table of Contents
1.2 Log in Using DepEd Commons Portal
1.2.1 Send activation instructions
1. Accessing DepEd Commons
This chapter will focus on the steps on how to access DepEd Commons. Students can access DepEd Commons using their O365 Microsoft account.
1.1 Account Activation
Student accounts will be sent an activation email on their O365 accounts. To activate your account, follow these steps:
Step 1. Log in to your email using O365 email.
Step 2. Find the email with the subject "Your DepEd Commons account is created and needs to be activated!".
Step 3. Click on the email and then click on the link to setup up a new password.
Step 4. Nominate a new password on the Change Your Password page.
Step 5. Edit your account information if necessary and click the Update button. You will be redirected to DepEd Commons Home page.
Figure 1. Activation Link Sent via Email
Figure 2. Change Password Page
1.2 Log in Using DepEd Commons Portal
For an activated student account, log in to DepEd Commons by following these steps:
Step 1. Go to https://commons.deped.gov.ph/ and click the Login button at the bottom left.
Step 2. Click Login to Commons Account.
Step 4. Enter your email address and password and click Login to Commons Account button. You will be redirected to the DepEd Commons Home page.
1.2.1 Send activation instructions
If you have not received any activation link on your email, click on Didn't receive activation instructions? at the bottom of the Log In page. You will receive an email regarding the activation of your account.
1.2.2 Reset Password
If you have forgotten your DepEd Commons account password, you may click on Forgot your password? at the bottom of the Log In page. You will be redirected to Forgot Your Password? page. Enter your email and click on the Send Request button. An email should be sent to you regarding password reset. Follow these steps after receiving the reset password instructions on your email:
Step 1. Open the email with the reset password instructions.
Step 2. Click the Change my password link on the email.
Step 3. Nominate a new password and click the Change my password button.
You should now be able to log in to DepEd Commons.
1.3 Sign In with Microsoft
To log in to DepEd Commons via your DepEd Microsoft O365 account, go to https://commons.deped.gov.ph/ and click the Login button at the top left. Select Login as Student.
Step 1. Click the Sign in with Microsoft button.
Step 2. Select Tenant and click the Sign In button.
Step 3. Enter my O365 email. Click Next.
Step 4. Enter the password to my O365 account. Click Sign In.
Follow the prompts to authenticate and authorize DepEd Commons to use Microsoft sign-in to login. After a successful login, you will now be redirected to the DepEd Commons homepage.
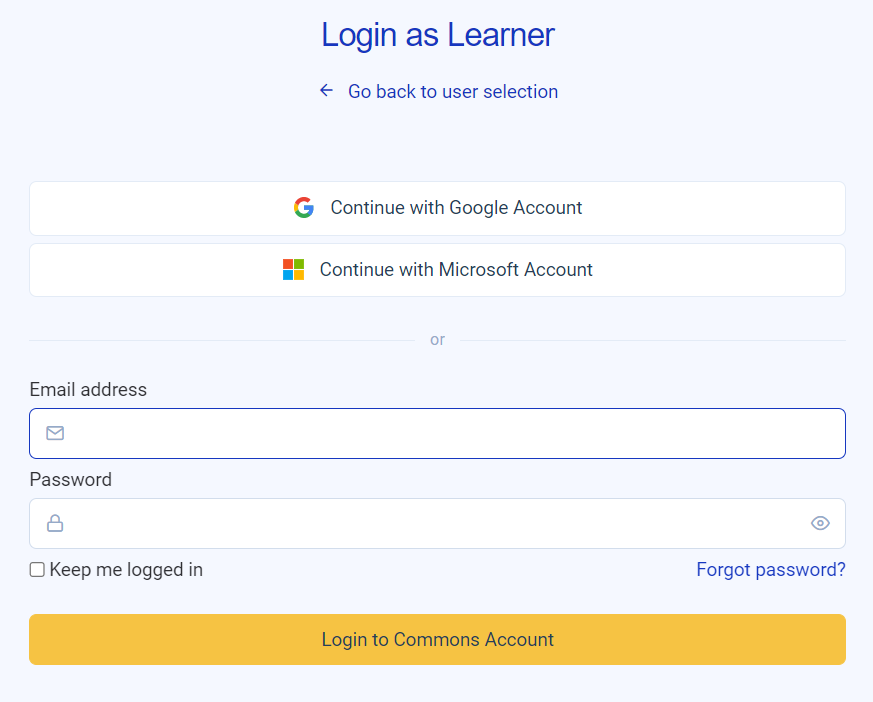
Figure 3. Student Log In Page
2. Student Portal
The student portal page is where students will have access to all the available resources in DepEd Commons. The user interface of the home page is very straight-forward and easy-to-use. In this chapter, we will discuss the three (3) main parts of the home page.
Figure 4. Student Portal
3. Resources
3.1 Search Resources
In the home page, the search functionality is displayed for easier access of available resources that are published in DepEd Commons. To search for a resource, follow these steps:
Step 1. Select a grade from the grade level drop down. You may click on the search button after this step. This will display all the published resources from the selected grade level.
Step 2. Select a subject from the subject drop down. You may click on the search button after this step. This will display all the published resources from the selected subject of the selected grade level.
Step 3. On the search bar field, type in the tile of the resource, the name of the author, the category type of the resource, or a tag/keyword. Click the Search button. This will display all the published resources from the selected subject of the selected grade level with the word/s that you have entered on the search bar.
The category type of resources are Assessment, Game/Puzzle, Interactive Offline, Presentations, Video, Mobile Applications, Activity Sheets and Notes, Self Learning Module (SLM), and Electronic SLM.
Figure 5. Search result of a search query
In Figure 5., the selected grade level is Grade 2, the subject is English, and the keyword used is "recognizing". The search query displayed two results where both resources are filed under Grade 2 - English with the keyword "recognizing" found on each title.
3.2 Resource Card
After the results are displayed upon your search query, you will see that there are several information included on the resource's card details. We will discuss the seven (7) parts of the resource card.
1. Thumbnail - This is the image that is displayed on the left-most part of the resource card.
2. Title - This is the resource's title.
3. Category type - This specifies what type of learning material the resource is.
4. Number of downloads - The number of downloads is the total number of times a resource has been downloaded and viewed. Clinking on the link attached to a resource is counted as a view/download.
5. Ratings - Ratings are the average ratings given by teachers and students.
6. Likes - Likes are the total number of likes that students and teachers have given to the resource.
Figure 6. Resource Card Details
3.3 Resource Page
In this section, we will discuss the resource page where you will see the full information about the resource. The resource page also contains the action buttons to rate and like the resource. To go to this page, simply click anywhere on the resource card and it will redirect you to the resource page.
The parts of the resource page are the following:
1. Learning Period - This indicates the learning period that the resource is used for.
2. Description - This portion contains any information relating to the resource.
3. Download or Go To link -To download the resource, click on the Download File button. To go to the link of the resource, click on Go to link.
To like a resource, simply click on the heart icon.
Parts 4 and 5 will be discussed on the next sections.
Figure 7. Full Information of a Resource Page
3.4 Offline Documents
Offline documents are resources that can be accessed even without an internet connection. Follow these steps to make a document available offline and to access the offline document:
Step 1. Click on the three vertical dots shown on number 1 of Figure 7.
Step 2. Click on "Make Available Offline". You should see this icon indicating that the document is available offline. This will make the resource downloadable even when you encounter internet disconnection.
Step 3. Click on the drop down at the top right corner of the header where your email is displayed. Select "Offline Documents." This will redirect you to the documents that you have made available offline.
Step 4. Click on the Download button to download the file.
Figure 8. Offline Documents Page
3.5 Reviews
Resources published on DepEd Commons can be rated. Overall ratings of a resource can be found on the resource information page as shown in Figure 7. To write a review and to rate the resource, follow these steps:
Step 1. Click on the Write a Review button.
Step 2. Rate the resource by criteria. The criteria for rating are Content, Presentation, Relatability, Clarity, and Suitability. Each criteria can be given a score of 1 to 5.
Step 3. Type in any additional comments if you have any. This is not a required step.
Step 4. Click the Submit Review button.
Figure 9. Page for Rating a Resource
On the resource page, you will see all the ratings of the resource including the rating that you have given.
Figure 9. Ratings of the Resource from Student Accounts
4. Grade Levels
On the header of the web application, you will see Grade Levels. By clicking this, you will be redirected to a page allowing you to select from the list of Grade Levels. Clicking on a grade level will redirect you to a list of subjects found in the grade level. Select a subject from the list and it will display all the published resources under this category.
Figure 10. List of Resources in Grade 3 - Araling Panlipunan
A search functionality is also seen on this page. This is the same as the search feature found on the home page.
5. View History
DepEd Commons has a view history feature where you can see a list of resources that you have downloaded, made available offline, or have clicked on the link. This feature can help you check which resource you downloaded most recently or what resource you have checked out.
Figure 11. View History Page
6. Feedback
On the bottom-left of the web application you will see "Feedback". The feedback form is a feature that students or parents of students may use to send in their feedbacks, inquiries, and/or comments. To send in your feedback, follow these steps:
Step 1. Click on the Feedback link.
Step 2. Select if you are a Student or Parent/Guardian.
Step 3. Fill out the required fields and your inquiries or feedback.
Step 4. Click the Submit button.
User Guide for Uploader
Table of Contents
1. Accessing DepEd Commons
1.1 Log in to DepEd Commons
As an uploader, log in to DepEd Commons by following these steps:
Step 1. Go to https://commons.deped.gov.ph/ and click the Login button at the bottom left.
Step 2. Select Login as Uploader.
Step 3. Enter your email address and password and click the LOG IN button. You will be redirected to DepEd Commons Home page.

Figure 1. Login Page for Uploader
1.2 Reset Password
If you have forgotten your DepEd Commons account password, you may click on Forgot your password? at the bottom of the Log In page. You will be redirected to Forgot Your Password? page. Enter your email and click on the Send Request button. An email should be sent to you regarding password reset. Follow these steps after receiving the reset password instructions on your email:
Step 1. Open the email with the reset password instructions.
Step 2. Click the Change my password link on the email.
Step 3. Nominate a new password and click the Change my password button.
You should now be able to log in to DepEd Commons.
2. Uploader Portal
The uploader portal page is where you will have access to all the available resources in DepEd Commons. The user interface of the home page is very straight-forward and easy-to-use. In this chapter, we will discuss the three (3) main parts of the home page.
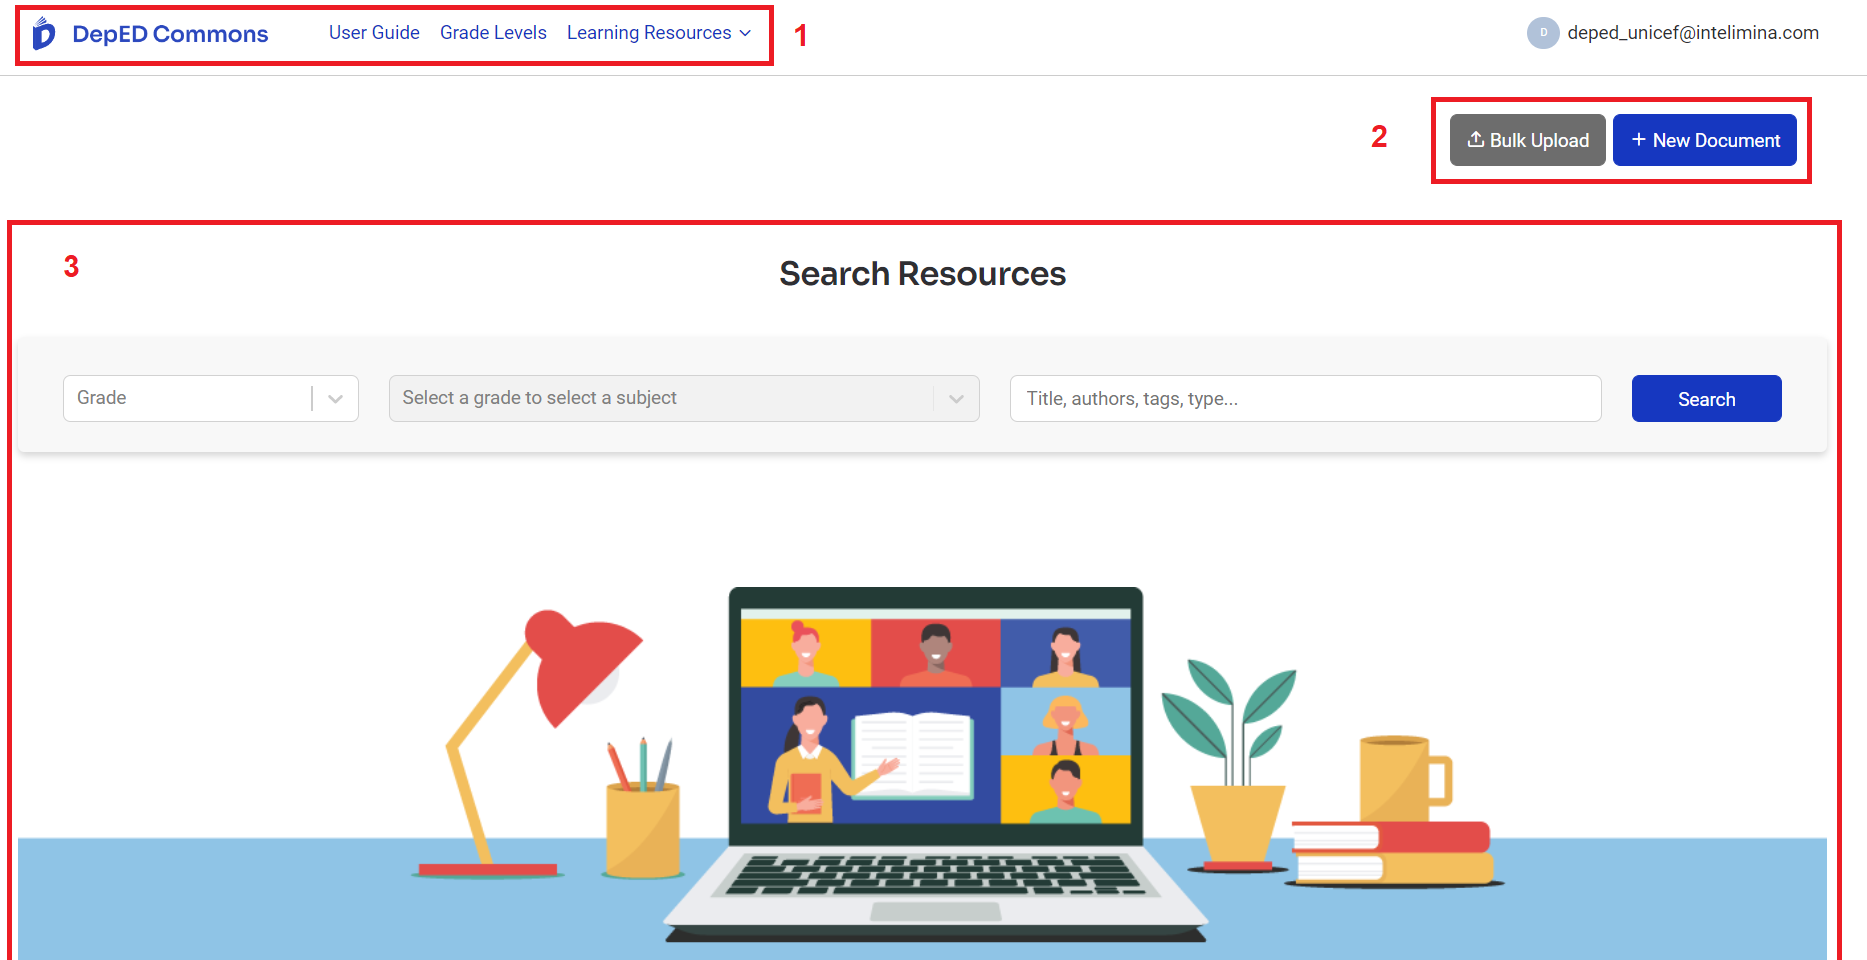
Figure 2. Uploader Portal
3. Upload Resources
As an uploader, you will mainly use the two buttons found on the home page which are the Bulk Upload and the New Document button. Bulk uploading allows you to upload more than one file at a time while clicking the New Document button will only allow you to upload one file at a time.
3.1 Bulk Upload
To use the bulk upload functionality, follow these steps:
Step 1. Click the Bulk Upload button.
Step 2. In the box where it says "Drop files here to upload", simply drag and drop the files that you want to upload or click on the said box and a file manager will appear for you to select which files you want to upload.
Step 3. Input a title for each file and select the learning period, grade level and subject where each file should be uploaded as shown on Figure 3.
Step 4. Click on the Start Upload button and the files will be uploaded on the web application.
Click on "Visit" beside the uploaded file to go to its individual page where you can update or edited any information of the uploaded resource.

Figure 3. Files Selected for Bulk Uploaded
3.2 Upload a File
To upload a single file, simply follow these steps:
Step 1. Click the New Document button.
Step 2. Fill out the form. Provide a link, attach a file, and a thumbnail if you have any. Make sure to fill out the required fields. The required fields(*) and optional fields are the following:
- Ordinality - This is an optional field for the display order of the document.
- Title* - The title of the document is a required field that needs to be filled.
- Description - An optional field to describe the document briefly.
- Category* - A dropdown list to choose for the grade level and subject that the document belongs to. This is a required field.
- Resource Type* - A dropdown list to set a document’s resource type. It can be an assessment, game/puzzle, interactive offline, presentation, video, mobile application, activity sheets and notes, self-learning module, electronic SLM, or a supplementary resource material.
- Learning Period - This field sets which learning period a document is for (1st quarter, 2nd quarter, 3rd quarter, 4th quarter, 1st semester, 2nd semester, or N/A). If an Uploader leaves this field as blank or without setting a value, then the uploaded resource will not be visible by other user accounts.
- Link - An uploader may provide a link if a document is available online.
- File - An uploader selects a file or multiple files to upload on the web application.
- Thumbnail - This is an image that will be shown as a thumbnail for the document.
Step 3. Click the Create Document button.
An uploaded document will have a "Pending Approval" status which means that it is subject for approval of an Approver. It will only be visible on the Resource Module if it has been approved and published.

Figure 4. New Document Form
4. My Uploaded Files
As an uploader, you can access the files that you have uploaded on DepEd Commons through this page. Follow these steps to see your uploaded files:
Step 1. At the upper right corner of the header you will see you email address. Click on your email to see a dropdown selection.
Step 2. Click "My Uploaded Files" on the dropdown selection. You will see the Grade Levels page. The number beside each grade level indicates how many files you have uploaded on that grade level.
Step 3. Select a grade level from the list. This will redirect you to the list of subjects under the grade level you selected. The number beside each subject indicates how many files you have uploaded on that subject.
Step 4. Select a subject from the list. This will display all the resources that you have uploaded on the grade level and subject that you selected.
On the next section, we will further discuss the resources and all the details posted about a resource.
5. Resources
5.1 Search Resources
In the home page, the search functionality is displayed for easier access of available resources that are published in DepEd Commons. To search for a resource, follow these steps:
Step 1. Select a grade from the grade level drop down. You may click on the search button after this step. This will display all the published resources from the selected grade level.
Step 2. Select a subject from the subject drop down. You may click on the search button after this step. This will display all the published resources from the selected subject of the selected grade level.
Step 3. On the search bar field, type in the tile of the resource, the name of the author, the category type of the resource, or a tag/keyword. Click the Search button. This will display all the published resources from the selected subject of the selected grade level with the word/s that you have entered on the search bar.
The category type of resources are Assessment, Game/Puzzle, Interactive Offline, Presentations, Video, Mobile Applications, Activity Sheets and Notes, Self Learning Module (SLM), and Electronic SLM.
Figure 5. Results from a Search Query
In Figure 5., the selected grade level is Grade 2, the subject is English, and the keyword used is "recognizing". The search query displayed two results where both resources are filed under Grade 2 - English with the keyword "recognizing" found on each title.
5.2 Resource Card
After the results are displayed upon your search query, you will see that there are several information included on the resource's card details. We will discuss the seven (7) parts of the resource card.
1. Thumbnail - This is the image that is displayed on the left-most part of the resource card.
2. Title - This is the resource's title.
3. Category type - This specifies what type of learning material the resource is.
4. Number of downloads - The number of downloads is the total number of times a resource has been downloaded and viewed. Clinking on the link attached to a resource is counted as a view/download.
5. Ratings - Ratings are the average ratings given by teachers and students.
6. Likes - Likes are the total number of likes that students and teachers have given to the resource.
Figure 6. Resource Card Details
5.3 Resource Page
In this section, we will discuss the resource page where you will see the full information about the resource. The resource page also contains the action buttons to download the resource, go to provided link, and edit the resource. To go to this page, simply click anywhere on the resource card and it will redirect you to the resource page.
The parts of the resource page are the following:
1. Status and Upload Details - The status indicates if the file is pending for approval, for review, approved, or published. Other details include the uploader, approver, and publisher name along with the time that the action has been executed. This section will only be visible to files that you have uploaded.
2. Edit Document - Click the Edit Document button to update the resource that you have uploaded. You can only edit documents that you have uploaded.
3. Download or Go to link - You can download the resource or go to the link provided.
4. Information - This section contains the learning period where the resource is uploaded to, the description, and the tags of the resource if any.
5. Document Ratings - Teacher and student accounts may leave a rating for a resource. The overall ratings is displayed if there are any ratings made on the resource.
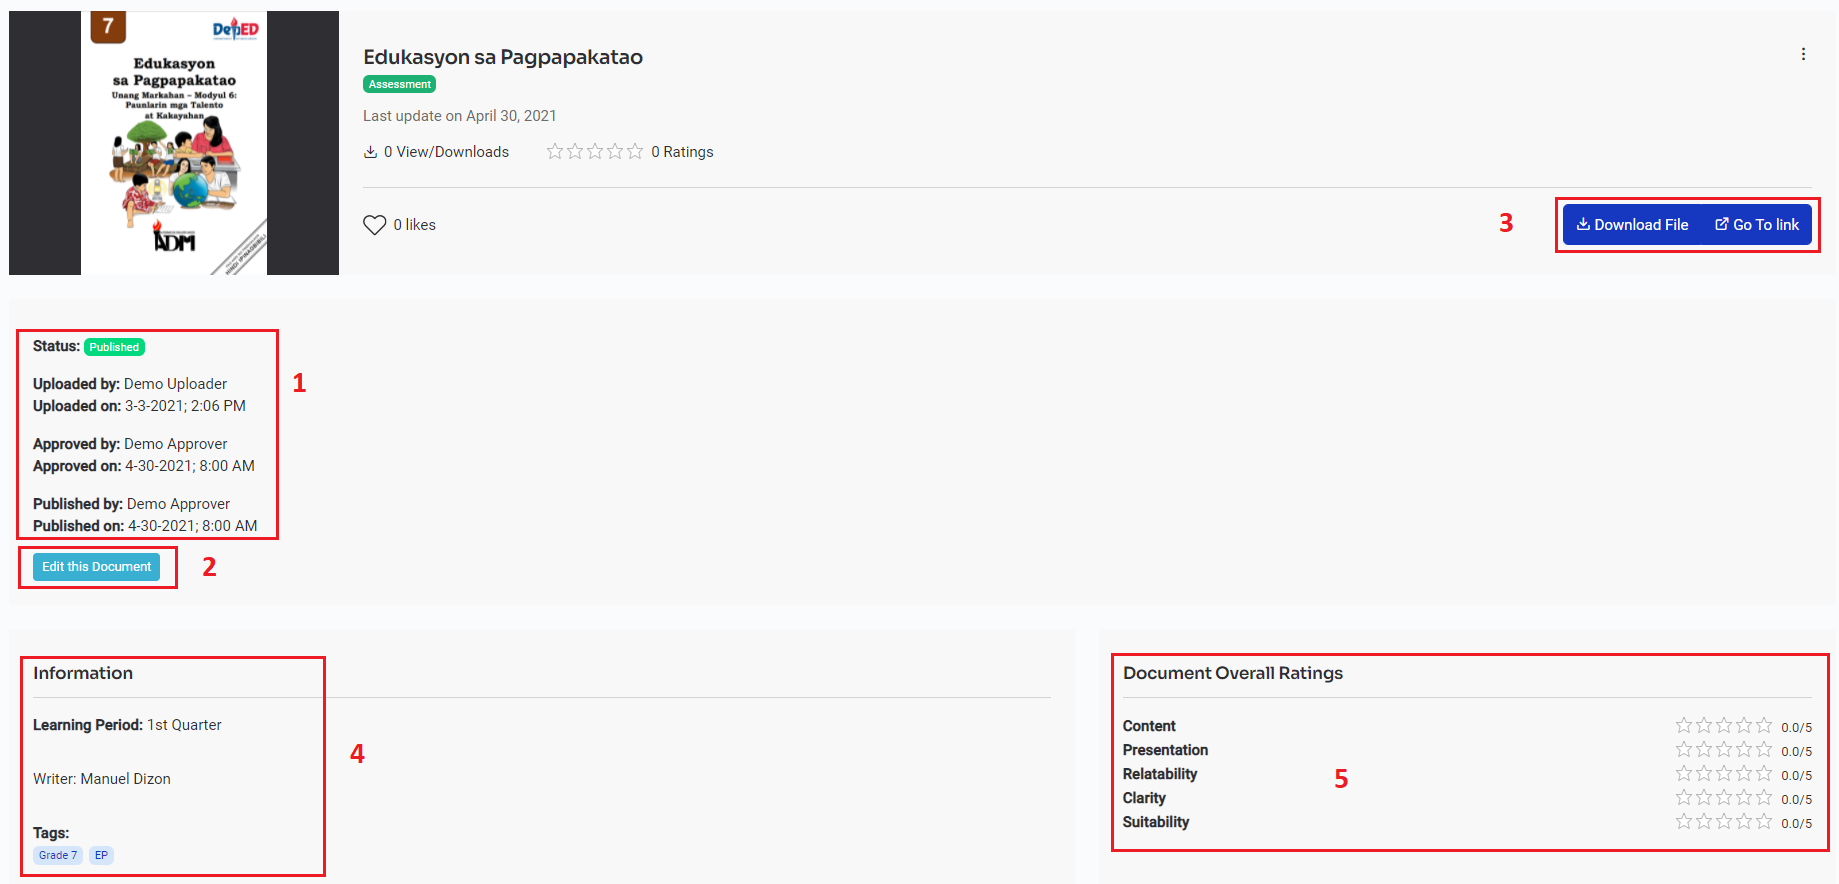
Figure 7. Full Information of a Resource Page
6. Grade Levels
On the header of the web application, you will see Grade Levels. By clicking this, you will be redirected to a page allowing you to select from the list of Grade Levels. Clicking on a grade level will redirect you to a list of subjects found in the grade level. Select a subject from the list and it will display all the published resources under this category.
Figure 8. List of Resources in Grade 3 - Araling Panlipunan
A search functionality is also seen on this page. This is the same as the search feature found on the home page.
7. Edit Account
As an uploader, you can update or edit your account details. Follow these steps to update your information:
Step 1. At the upper right corner of the header you will see you email address. Click on your email to see a dropdown selection.
Step 2. Click "Edit Account" on the dropdown selection. You will see the Edit Account page.
Step 3. On the Personal Details tab, you may update your first, middle, and last name. Click the Update button to save the changes.
Step 4. On the Credentials tab, you may update your password by setting a new password to use for logging in to DepEd Commons. Click the Update button to save the changes.
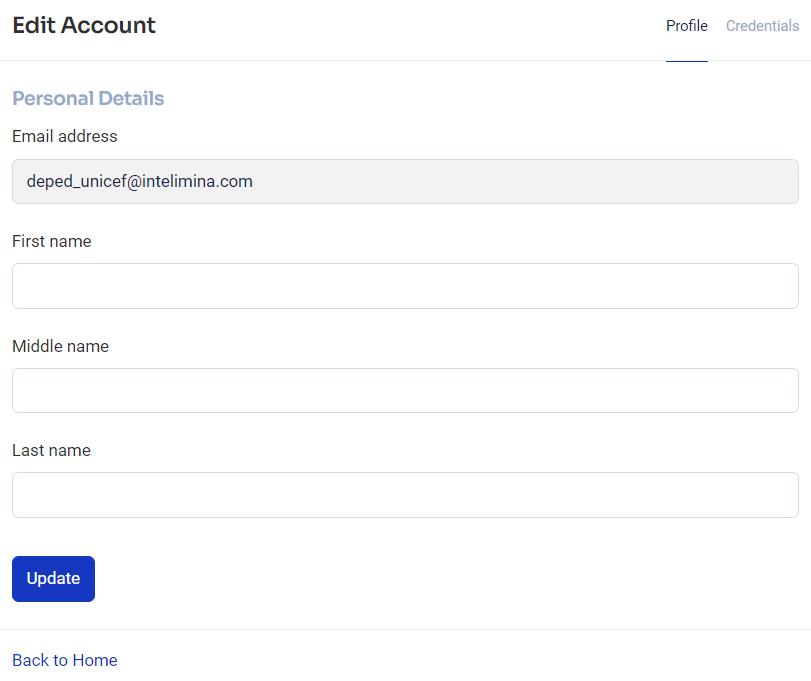
Figure 9. Edit Account page to update personal details and login credentials.
User Guide For Approvers
Table of Contents
1. Accessing DepEd Commons
1.1 Log in to DepEd Commons
As an approver, log in to DepEd Commons by following these steps:
Step 1. Go to https://commons.deped.gov.ph/ and click the Login button at the top left.
Step 2. Select Login as Approver.
Step 3. Enter your email address and password and click the LOG IN button. You will be redirected to DepEd Commons Home page.
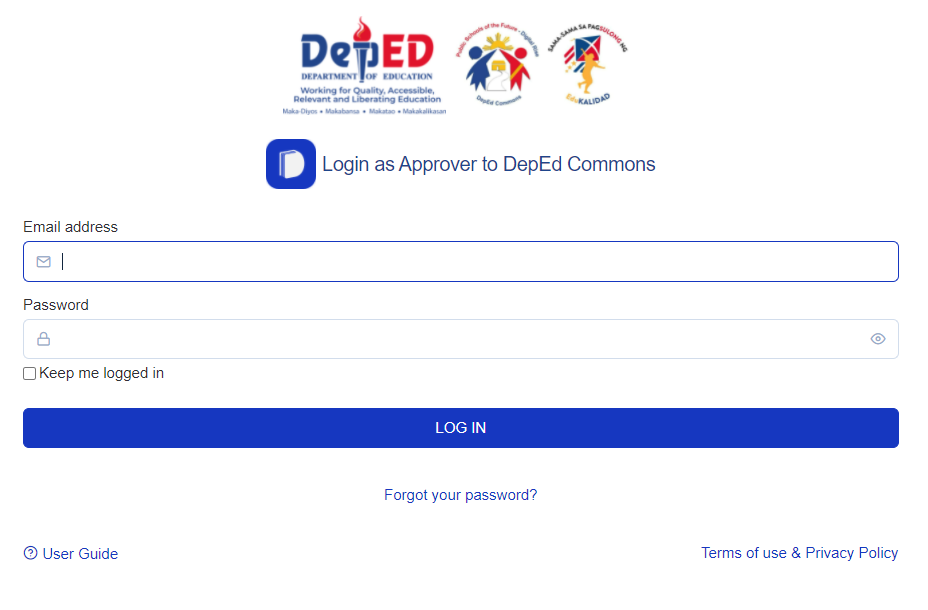
Figure 1. Login Page for Approver
1.2 Reset Password
If you have forgotten your DepEd Commons account password, you may click on Forgot your password? at the bottom of the Login page. You will be redirected to Forgot Your Password? page. Enter your email and click on the Send Request button. An email should be sent to you regarding password reset. Follow these steps after receiving the reset password instructions on your email:
Step 1. Open the email with the reset password instructions.
Step 2. Click the Change my password link on the email.
Step 3. Nominate a new password and click the Change my password button.
You should now be able to log in to DepEd Commons.
2. Approver Portal
The approver portal page is where you will have access to all the available resources in DepEd Commons. The user interface of the home page is very straight-forward and easy-to-use. In this chapter, we will discuss the four (4) main parts of the home page.
- Header - In this portion, you will see a list of links that will help you access different parts of the web app.
- Search Feature - The search feature allows you to search resources by grade, subject, keywords, and status.
- Search result - Your search query will display results in this portion of the web page.
- Account action buttons - These two buttons are what you will need to use for approving resources.
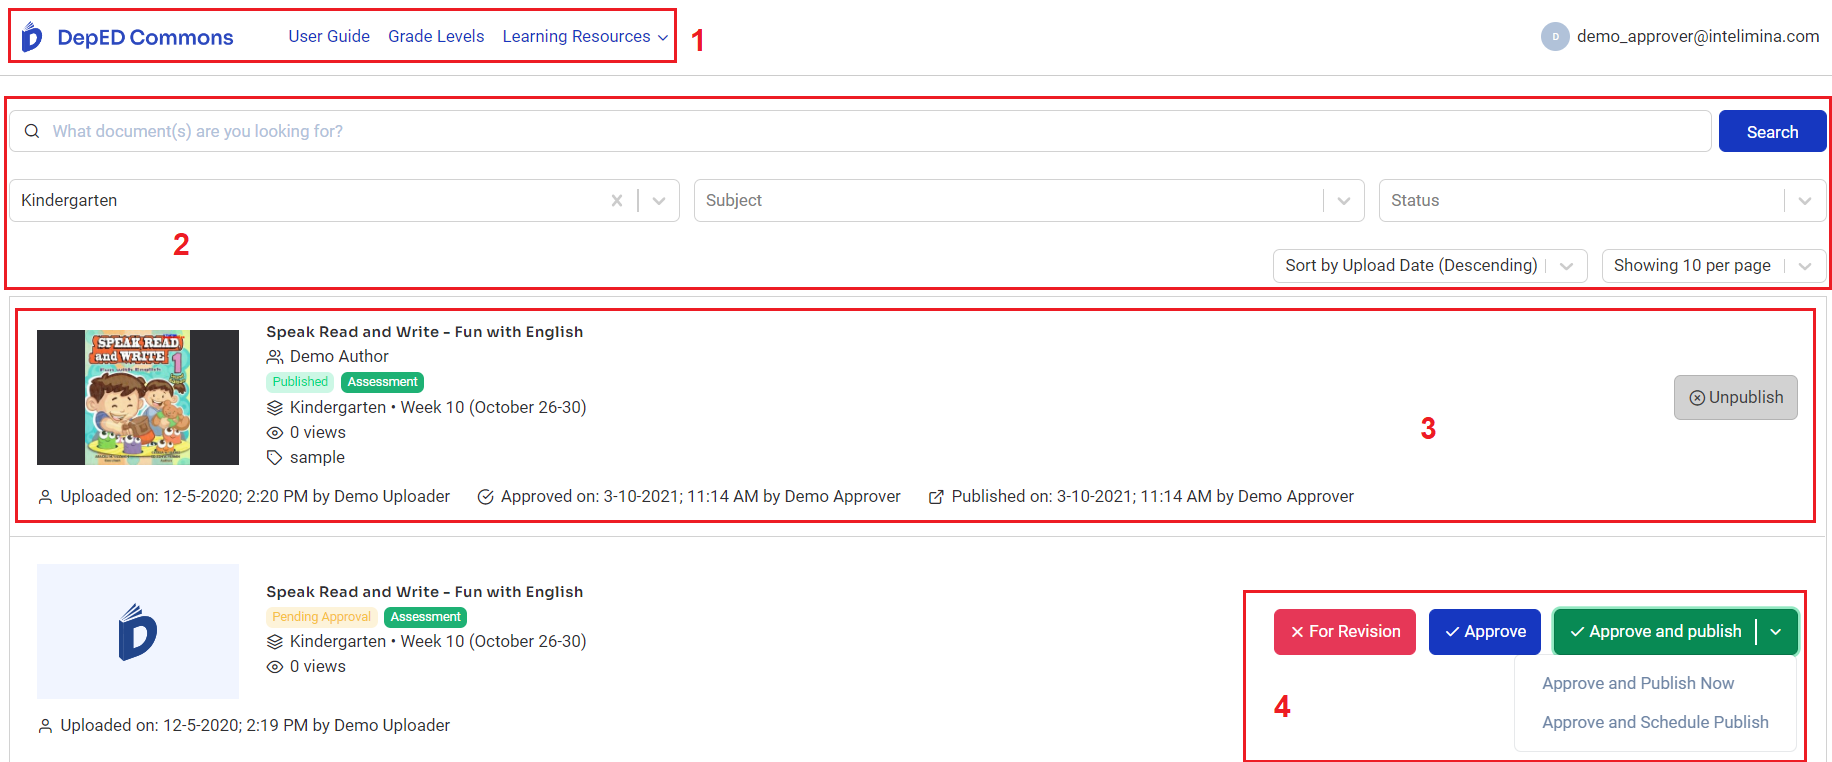
Figure 2. Approver Portal
3. Resources
3.1 Search Resources
In the home page, the search functionality is displayed for easier access of uploaded resources in DepEd Commons. To search for a resource, follow these steps:
Step 1. Select a grade from the grade level drop down. You may click on the search button after this step. This will display all the resources from the selected grade level.
Step 2. Select a subject from the subject drop down. You may click on the search button after this step. This will display all the resources from the selected subject of the selected grade level.
Step 3. On the search bar field, type in the title of the resource, the name of the author, the category type of the resource, or a tag/keyword. Click the Search button. This will display all the resources from the selected subject of the selected grade level with the word/s that you have entered on the search bar.
The category type of resources are Assessment, Game/Puzzle, Interactive Offline, Presentations, Video, Mobile Applications, Activity Sheets and Notes, Self Learning Module (SLM), and Electronic SLM.
Step 4. Select a status on the drop down beside the subject. Click the Search button. This will display all the resources according to your search query with the status that you have selected.
You can also choose to display the results in ascending or descending order of upload date and choose to display 10, 20, or 30 results per page.
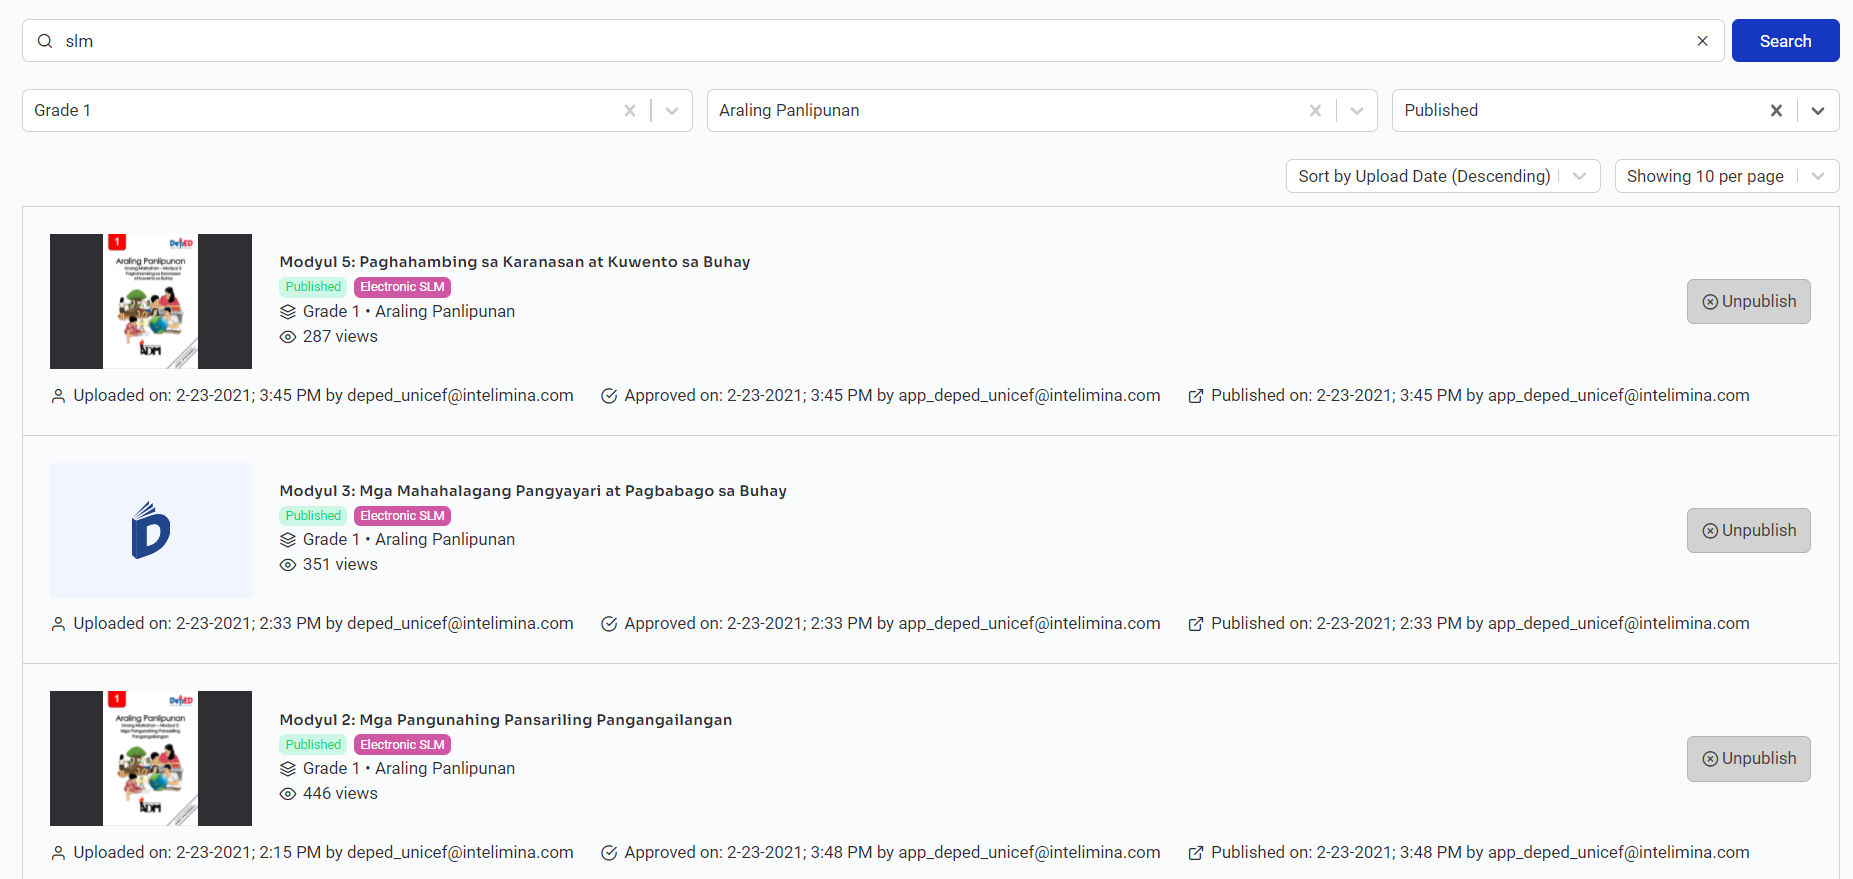
Figure 3. Results from a Search Query
In Figure 3, the selected grade level is Grade 1, the subject is Araling Panlipunan, and the keyword used is "SLM". The search query displayed two results where both resources are filed under Grade 2 - English with the category type SLM.
3.2 Resource Card
After the results are displayed upon your search query, you will see that there is several information included on the resource's card details. We will discuss the seven (7) parts of the resource card.
- Thumbnail - This is the image that is displayed on the left-most part of the resource card.
- Title - This is the resource's title.
- Status and Category type - The status of a resource can be the following:
- Pending Approval - Resources with this status can either be approved or set to for review by an approver.
- Approved - Resources with this status can be published.
- For revision - This status means that the resource lacks information or it has inappropriate content that needs to be changed.
- Published - Published resources are visible to all users of DepEd Commons.
- Scheduled for Publish - Resources with this status are not yet published but already have a date set to publish.
The category type specifies what type of learning material the resource is.
- Grade level and subject - This indicates which grade level and subject the resource belongs to.
- Number of views - The number of views is the total number of times a resource has been downloaded and viewed. Clinking on the link attached to a resource is counted as a view/download.
- Upload Details - It contains the uploader, approver, and publisher name along with the date of action.
- Action button - Buttons on a resource card depends on the status of the document. These are the action buttons that an approver can use:
- For Revision - An uploaded resource can be marked as For Revision if the approver decides that the resource needs to be edited.
- Approve - Mark an uploaded resource as Approved if there are no changes that need to be made.
- Approve and Publish - To approve and publish a resource, click on the Approve and Publish button. Clicking this button will show a drop down with options to “Approve and Publish Now” or “Approve and Schedule Publish”. If you choose to set a date for the publication of the resource, click Approve and Schedule Publish. A date picker will appear. Set the date and click on the Proceed button.
- Publish - An approved resource can be published now or be scheduled for publication. Click on the Publish button and a drop down menu will appear. Choose Publish Now if you want to publish the resource or choose Schedule Publish if you want to set a date for the publication. A date picker will appear if you choose to schedule the publish date.
- Unpublish - If you choose to unpublish a resource, its status will be updated to “Approved”.
- Edit Schedule - If you want to change the publication date of a resource that is still scheduled for publication, click on the Edit Schedule button and select a new publication date.
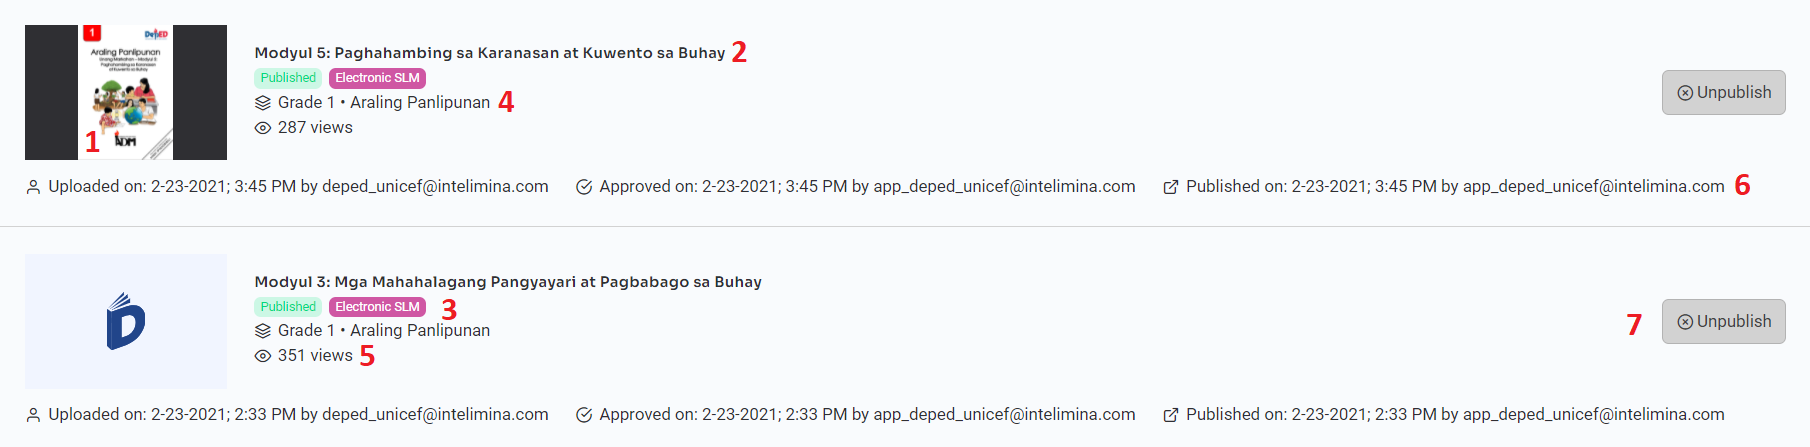
Figure 4. Resource Card Details
3.3 Resource Page
In this section, we will discuss the resource page where you will see the full information about the resource. The resource page also contains the action buttons discussed in the previous section along with the download button, and go to link button. To go to this page, simply click anywhere on the resource card and it will redirect you to the resource page.
The parts of the resource page are the following:
- Status and Upload Details - The status indicates if the file is pending for approval, for review, approved, or published. Other details include the uploader, approver, and publisher name along with the time that the action has been executed.
- Action button - The action button displayed depends on the status of the document. The button may be for review, approve, approve and publish, publish, unpublish, or edit schedule.
- Download or Go to link - You can download the resource or go to the link provided.
- Information - This section contains the learning period where the resource is uploaded to, the description, author/s and contributor/s, and the tags of the resource if any.
- Document Ratings - Teacher and student accounts may leave a rating for a resource. The overall ratings are displayed if there are any ratings made on the resource.
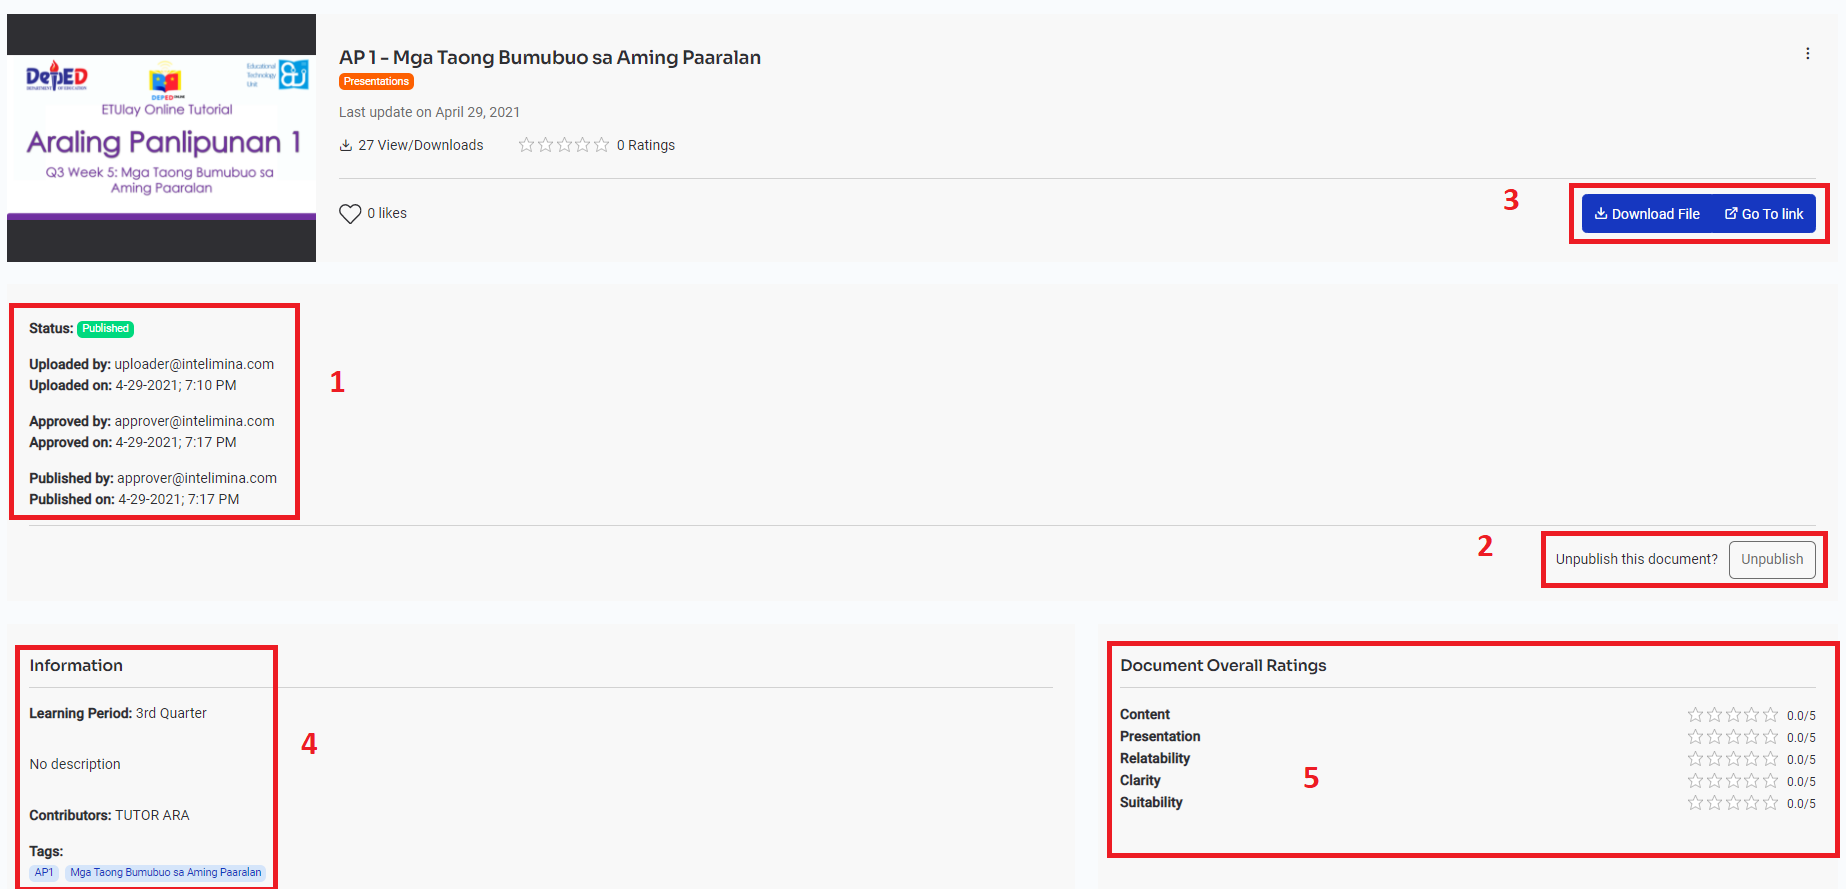
Figure 5. Full Information of a Resource Page
4. Grade Levels
On the header of the web application, you will see Grade Levels. By clicking this, you will be redirected to a page allowing you to select from the list of Grade Levels. Clicking on a grade level will redirect you to a list of subjects found in the grade level. Select a subject from the list and it will display all the resources under this category.

Figure 6. List of Resources in Grade 3 - Araling Panlipunan
A search functionality is also seen on this page. This is the same as the search feature found on the home page.
5. Edit Account
As an approver, you can update or edit your account details. Follow these steps to update your information:
Step 1. At the upper right corner of the header you will see you email address. Click on your email to see a dropdown selection.
Step 2. Click "Edit Account" on the dropdown selection. You will see the Edit Account page.
Step 3. On the Personal Details tab, you may update your first, middle, and last name. Click the Update button to save the changes.
Step 4. On the Credentials tab, you may update your password by setting a new password to use for logging in to DepEd Commons. Click the Update button to save the changes.
Figure 7. Edit Account page to update personal details and login credentials.
User Guide for Publishers
Table of Contents
1. Accessing DepEd Commons
1.1 Log in to DepEd Commons
As an approver, log in to DepEd Commons by following these steps:
Step 1. Go to https://commons.deped.gov.ph/ and click the Login button at the top left.
Step 2. Select Login as Approver.
Step 3. Enter your email address and password and click the LOG IN button. You will be redirected to DepEd Commons Home page.
Figure 1. Login Page for Approver
1.2 Reset Password
If you have forgotten your DepEd Commons account password, you may click on Forgot your password? at the bottom of the Login page. You will be redirected to Forgot Your Password? page. Enter your email and click on the Send Request button. An email should be sent to you regarding password reset. Follow these steps after receiving the reset password instructions on your email:
Step 1. Open the email with the reset password instructions.
Step 2. Click the Change my password link on the email.
Step 3. Nominate a new password and click the Change my password button.
You should now be able to log in to DepEd Commons.
2. Publisher Portal
The publisher portal page is where you will have access to all the available resources in DepEd Commons. The user interface of the home page is very straight-forward and easy-to-use. In this chapter, we will discuss the four (4) main parts of the home page.
- Header - In this portion, you will see a list of links that will help you access different parts of the web app.
- Search Feature - The search feature allows you to search resources by grade, subject, keywords, and status.
- Search result - Your search query will display results in this portion of the web page.
- Account action buttons - These two buttons are what you will need to use for publishing resources.
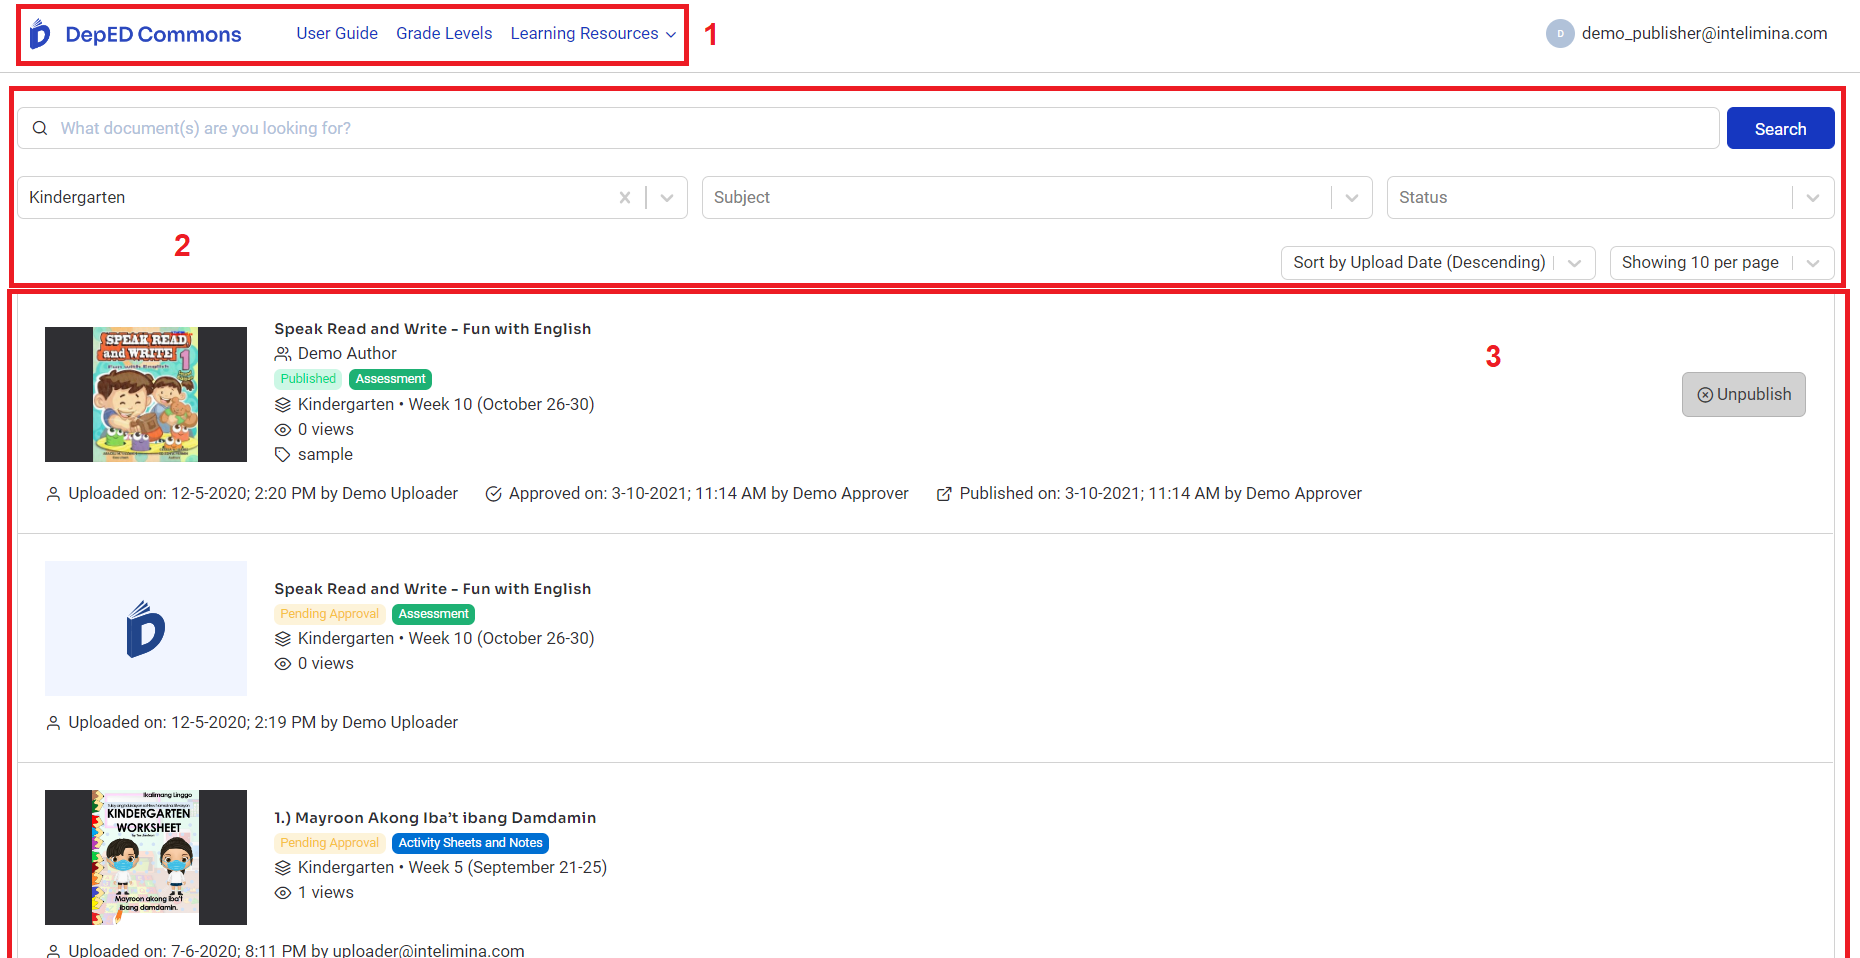
Figure 2. Publisher Portal
3. Resources
3.1 Search Resources
In the home page, the search functionality is displayed for easier access of uploaded resources in DepEd Commons. To search for a resource, follow these steps:
Step 1. Select a grade from the grade level drop down. You may click on the search button after this step. This will display all the resources from the selected grade level.
Step 2. Select a subject from the subject drop down. You may click on the search button after this step. This will display all the resources from the selected subject of the selected grade level.
Step 3. On the search bar field, type in the title of the resource, the name of the author, the category type of the resource, or a tag/keyword. Click the Search button. This will display all the resources from the selected subject of the selected grade level with the word/s that you have entered on the search bar.
The category type of resources are Assessment, Game/Puzzle, Interactive Offline, Presentations, Video, Mobile Applications, Activity Sheets and Notes, Self Learning Module (SLM), and Electronic SLM.
Step 4. Select a status on the drop down beside the subject. Click the Search button. This will display all the resources according to your search query with the status that you have selected.
You can also choose to display the results in ascending or descending order of upload date and choose to display 10, 20, or 30 results per page.
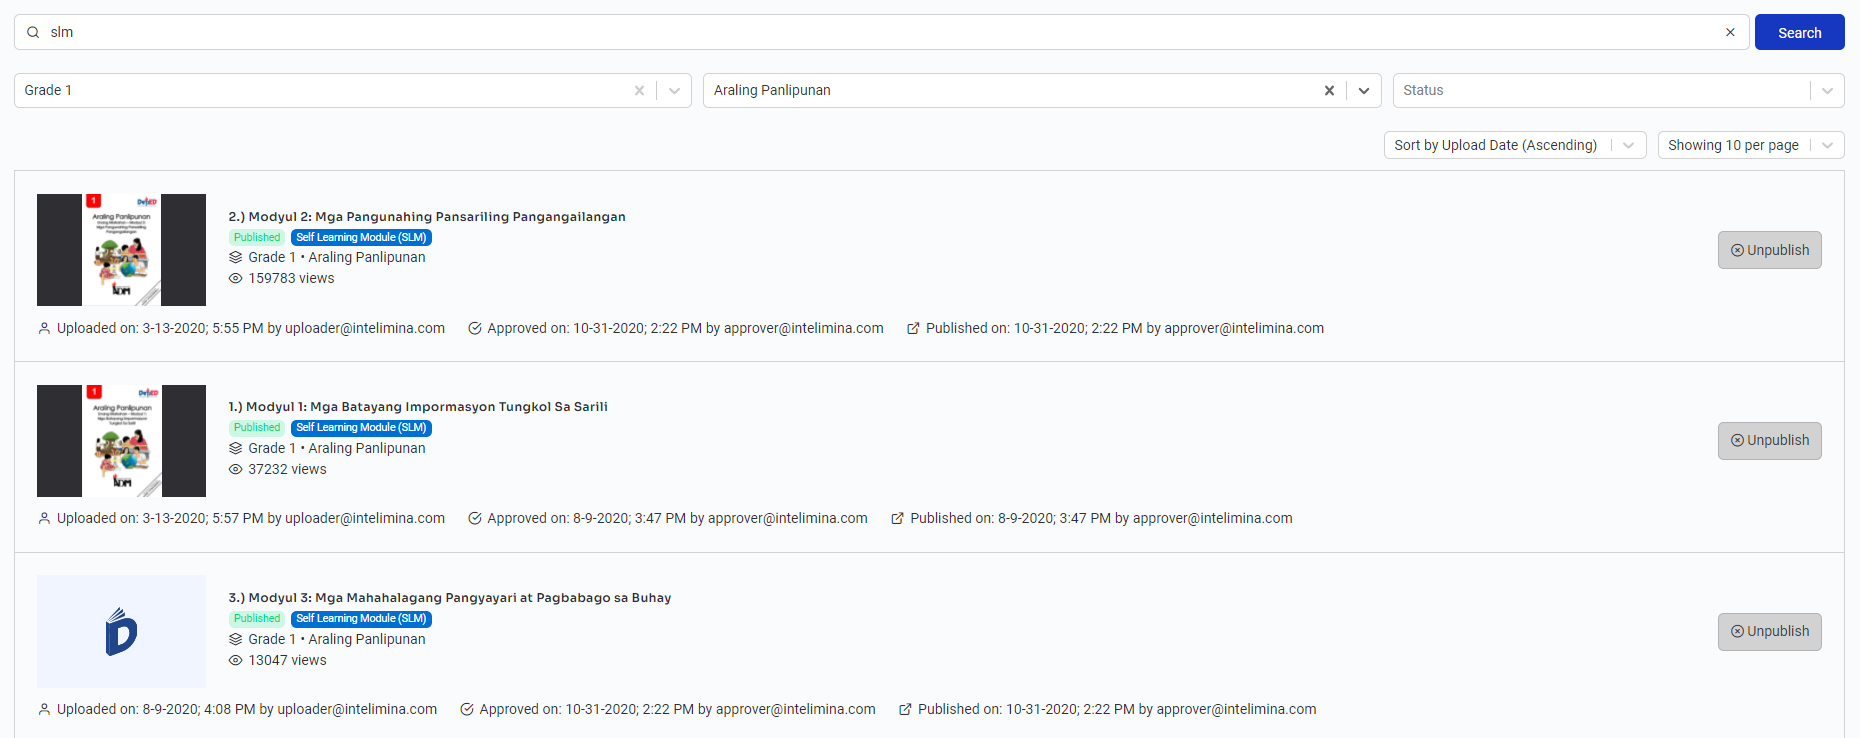
Figure 3. Results from a Search Query
In Figure 3, the selected grade level is Grade 1, the subject is Araling Panlipunan, and the keyword used is "SLM". The search query displayed two results where both resources are filed under Grade 2 - English with the category type SLM.
3.2 Resource Card
After the results are displayed upon your search query, you will see that there is several information included on the resource's card details. We will discuss the seven (7) parts of the resource card.
- Thumbnail - This is the image that is displayed on the left-most part of the resource card.
- Title - This is the resource's title.
- Status and Category type - The status of a resource can be the following:
- Pending Approval - Resources with this status can either be approved or set to for review by an approver.
- Approved - Resources with this status can be published.
- For revision - This status means that the resource lacks information or it has inappropriate content that needs to be changed.
- Published - Published resources are visible to all users of DepEd Commons.
- Scheduled for Publish - Resources with this status are not yet published but already have a date set to publish.
The category type specifies what type of learning material the resource is.
- Grade level and subject - This indicates which grade level and subject the resource belongs to.
- Number of views - The number of views is the total number of times a resource has been downloaded and viewed. Clinking on the link attached to a resource is counted as a view/download.
- Upload Details - It contains the uploader, approver, and publisher name along with the date of action.
- Action button - Buttons on a resource card depends on the status of the document. These are the action buttons that an approver can use:
- Publish - An approved resource can be published now or be scheduled for publication. Click on the Publish button and a drop down menu will appear. Choose Publish Now if you want to publish the resource or choose Schedule Publish if you want to set a date for the publication. A date picker will appear if you choose to schedule the publish date.
- Unpublish - If you choose to unpublish a resource, its status will be updated to “Approved”.
- Edit Schedule - If you want to change the publication date of a resource that is still scheduled for publication, click on the Edit Schedule button and select a new publication date.
Figure 4. Resource Card Details
3.3 Resource Page
In this section, we will discuss the resource page where you will see the full information about the resource. The resource page also contains the action buttons discussed in the previous section along with the download button, and go to link button. To go to this page, simply click anywhere on the resource card and it will redirect you to the resource page.
The parts of the resource page are the following:
- Status and Upload Details - The status indicates if the file is pending for approval, for review, approved, or published. Other details include the uploader, approver, and publisher name along with the time that the action has been executed.
- Action button - The action button displayed depends on the status of the document. The button may be for review, approve, approve and publish, publish, unpublish, or edit schedule.
- Download or Go to link - You can download the resource or go to the link provided.
- Information - This section contains the learning period where the resource is uploaded to, the description, author/s and contributor/s, and the tags of the resource if any.
- Document Ratings - Teacher and student accounts may leave a rating for a resource. The overall ratings are displayed if there are any ratings made on the resource.
Figure 5. Full Information of a Resource Page
4. Grade Levels
On the header of the web application, you will see Grade Levels. By clicking this, you will be redirected to a page allowing you to select from the list of Grade Levels. Clicking on a grade level will redirect you to a list of subjects found in the grade level. Select a subject from the list and it will display all the resources under this category.
Figure 6. List of Resources in Grade 3 - Araling Panlipunan
A search functionality is also seen on this page. This is the same as the search feature found on the home page.
5. Edit Account
As a publisher, you can update or edit your account details. Follow these steps to update your information:
Step 1. At the upper right corner of the header you will see you email address. Click on your email to see a dropdown selection.
Step 2. Click "Edit Account" on the dropdown selection. You will see the Edit Account page.
Step 3. On the Personal Details tab, you may update your first, middle, and last name. Click the Update button to save the changes.
Step 4. On the Credentials tab, you may update your password by setting a new password to use for logging in to DepEd Commons. Click the Update button to save the changes.

Figure 7. Edit Account page to update personal details and login credentials.